AccessPoint Cloud is a cloud-based PACS for securely storing, managing, viewing, and reporting on medical images. Hosted on AWS and FDA-compliant, AccessPoint Cloud provides healthcare professionals with remote access to DICOM studies. Designed for radiologists and medical imaging professionals, it supports multi- modality imaging, integrates with reporting platforms, and streamlines workflows. Users can securely upload, view, and share images from a browser with internet access.
Here you’ll find everything you need to get the most out of your APC solution — from setup guides and configuration tips to troubleshooting resources and the latest software updates. Use the menu on the left or the search bar above to quickly find answers and explore our training materials.
Updates to APC
Mark accreditation studies to refer back to as needed.
Search the patient list by indications.
See your measurements in live time as you select your points.
Use "View Read-Only" to see your measurements while inputting your observations.
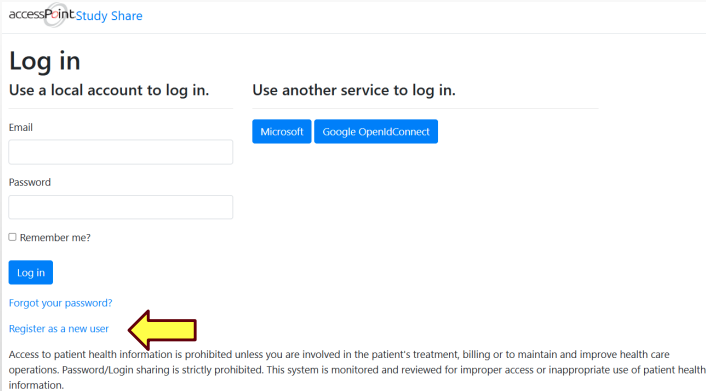
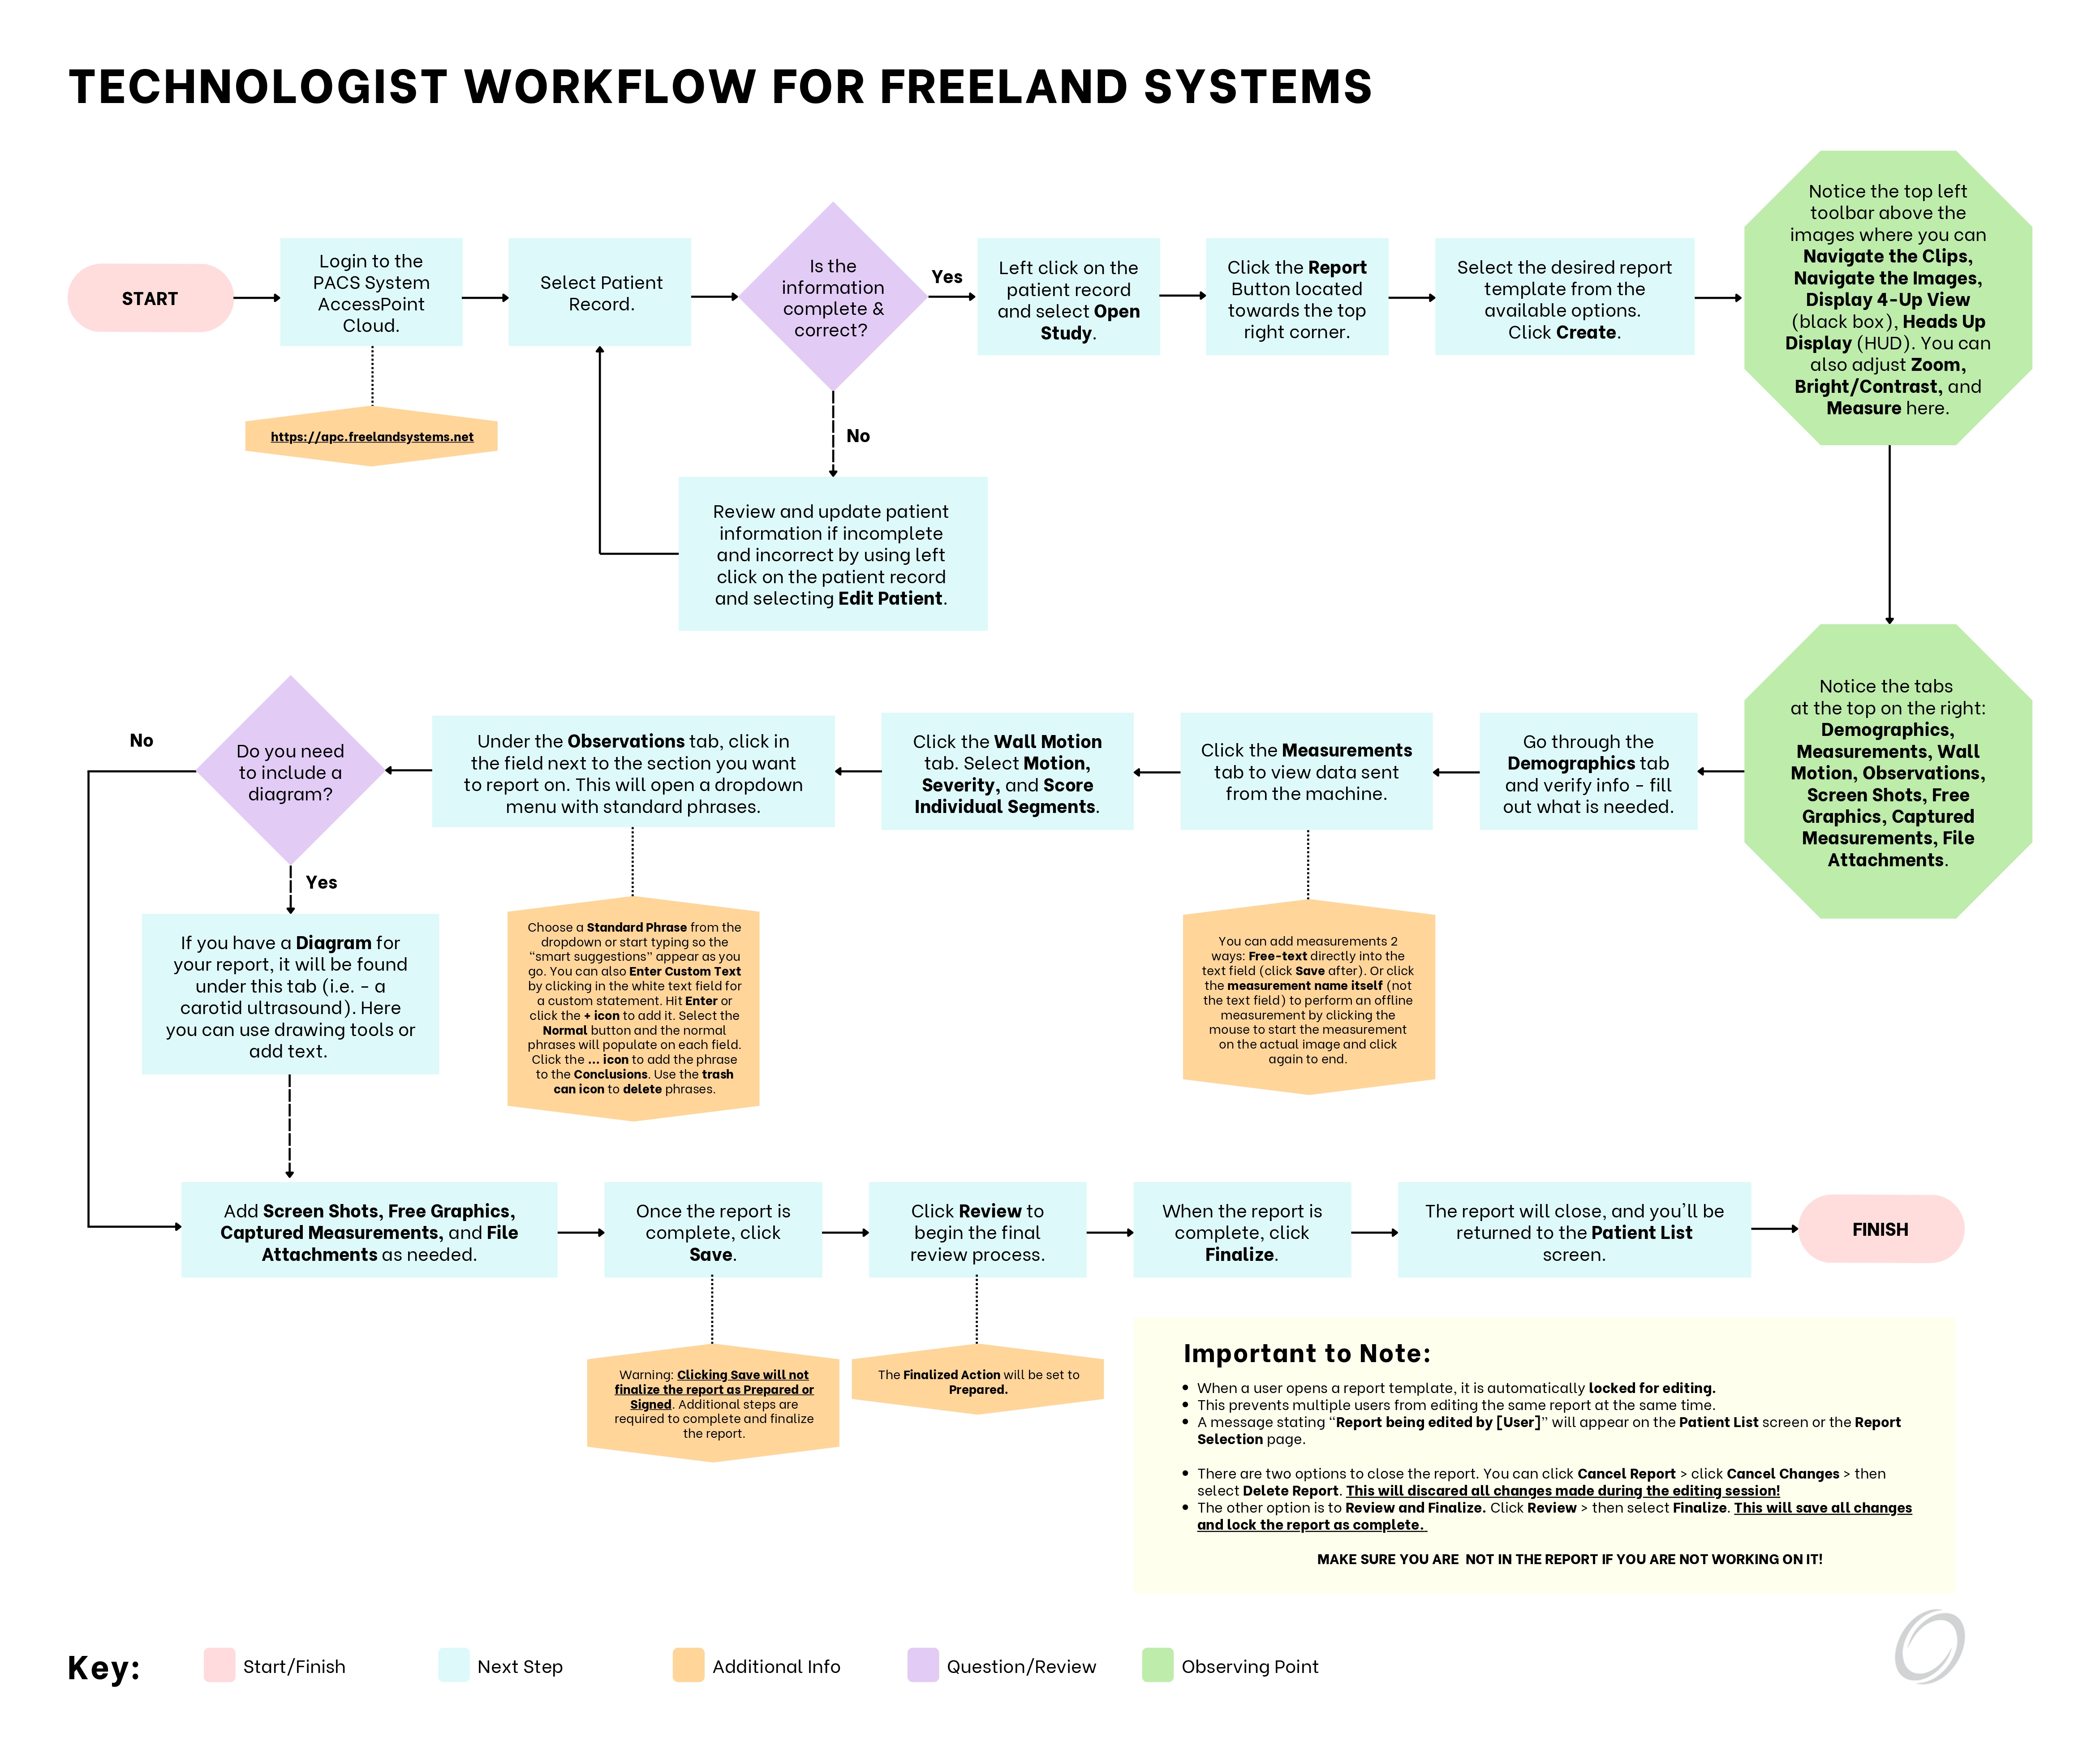
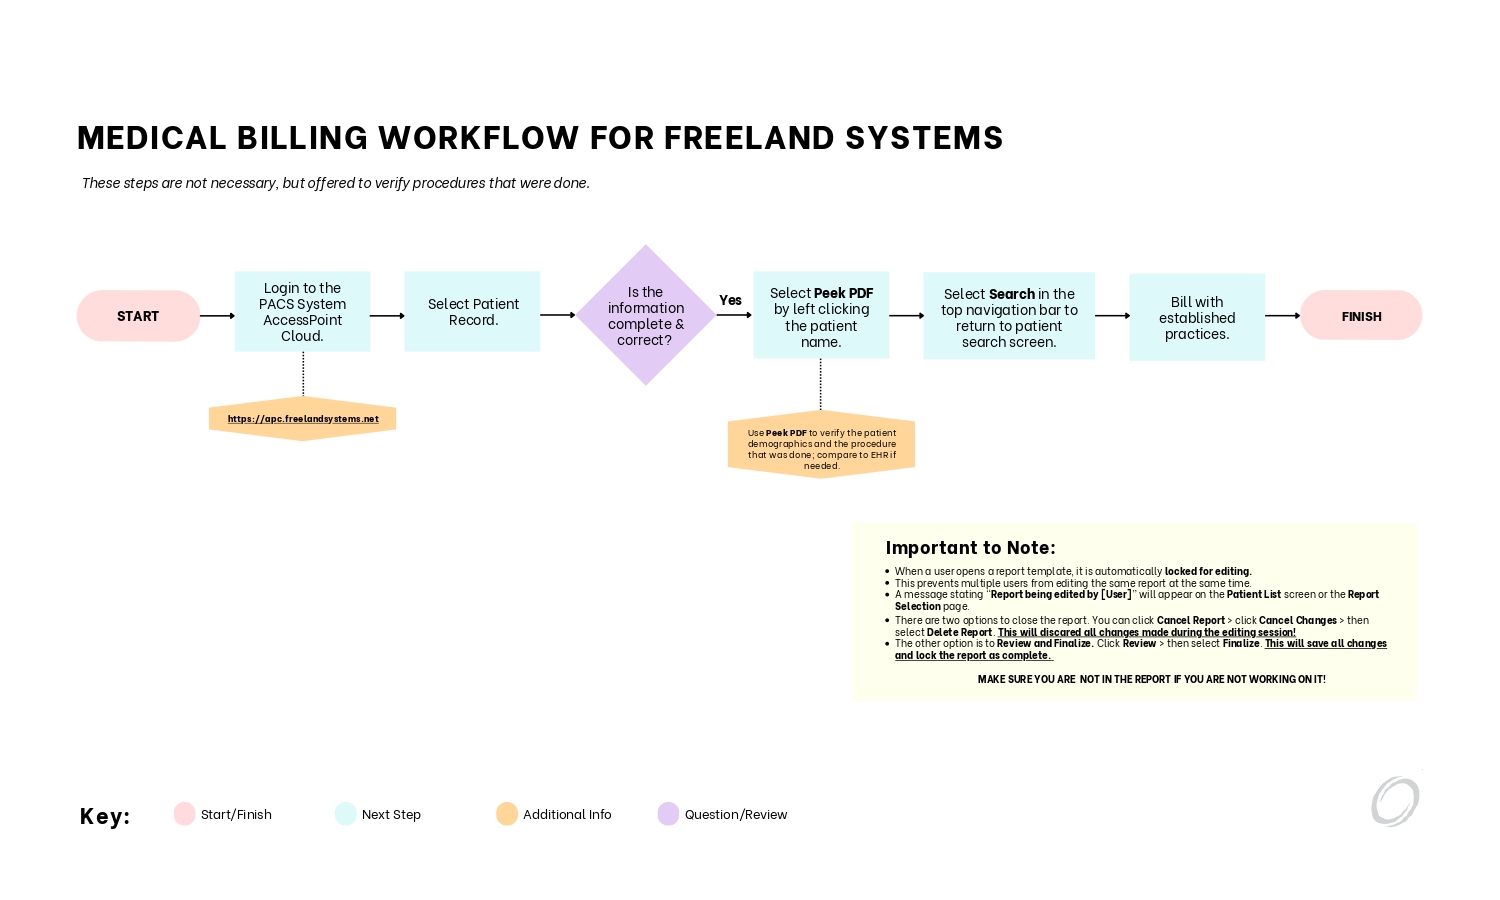
Enter your AccessPoint Cloud username and password.
Click Login.
If you have trouble, select Forgot Password or Forgot username
Press Enter.
Contact Freeland Systems at 1-888-615-1888 opt 2 or support@freelandsystems.com
Quick Start
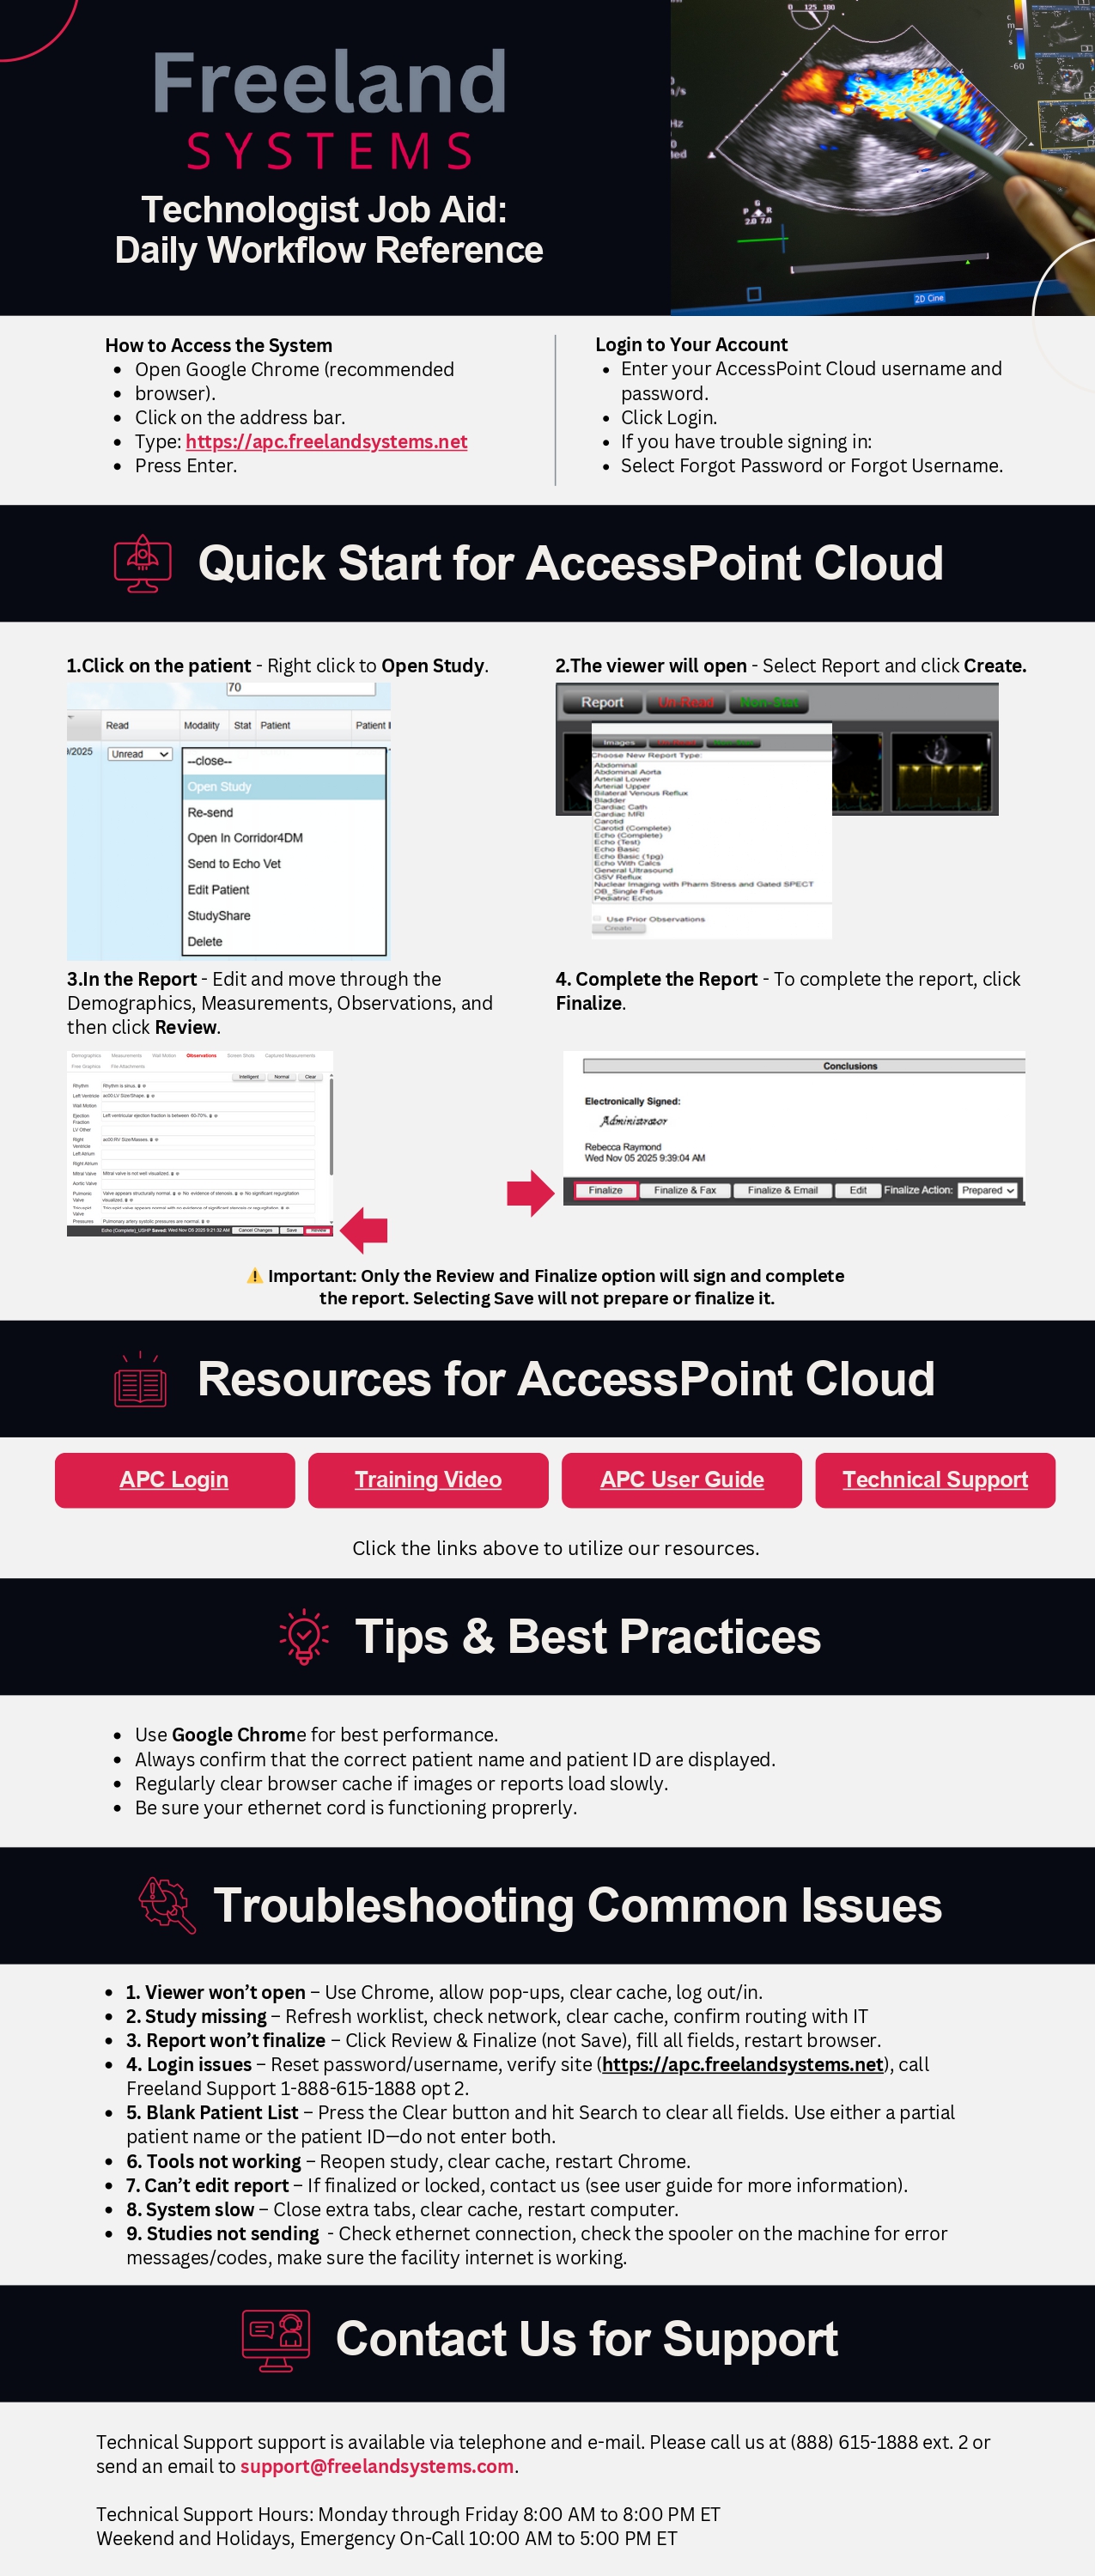
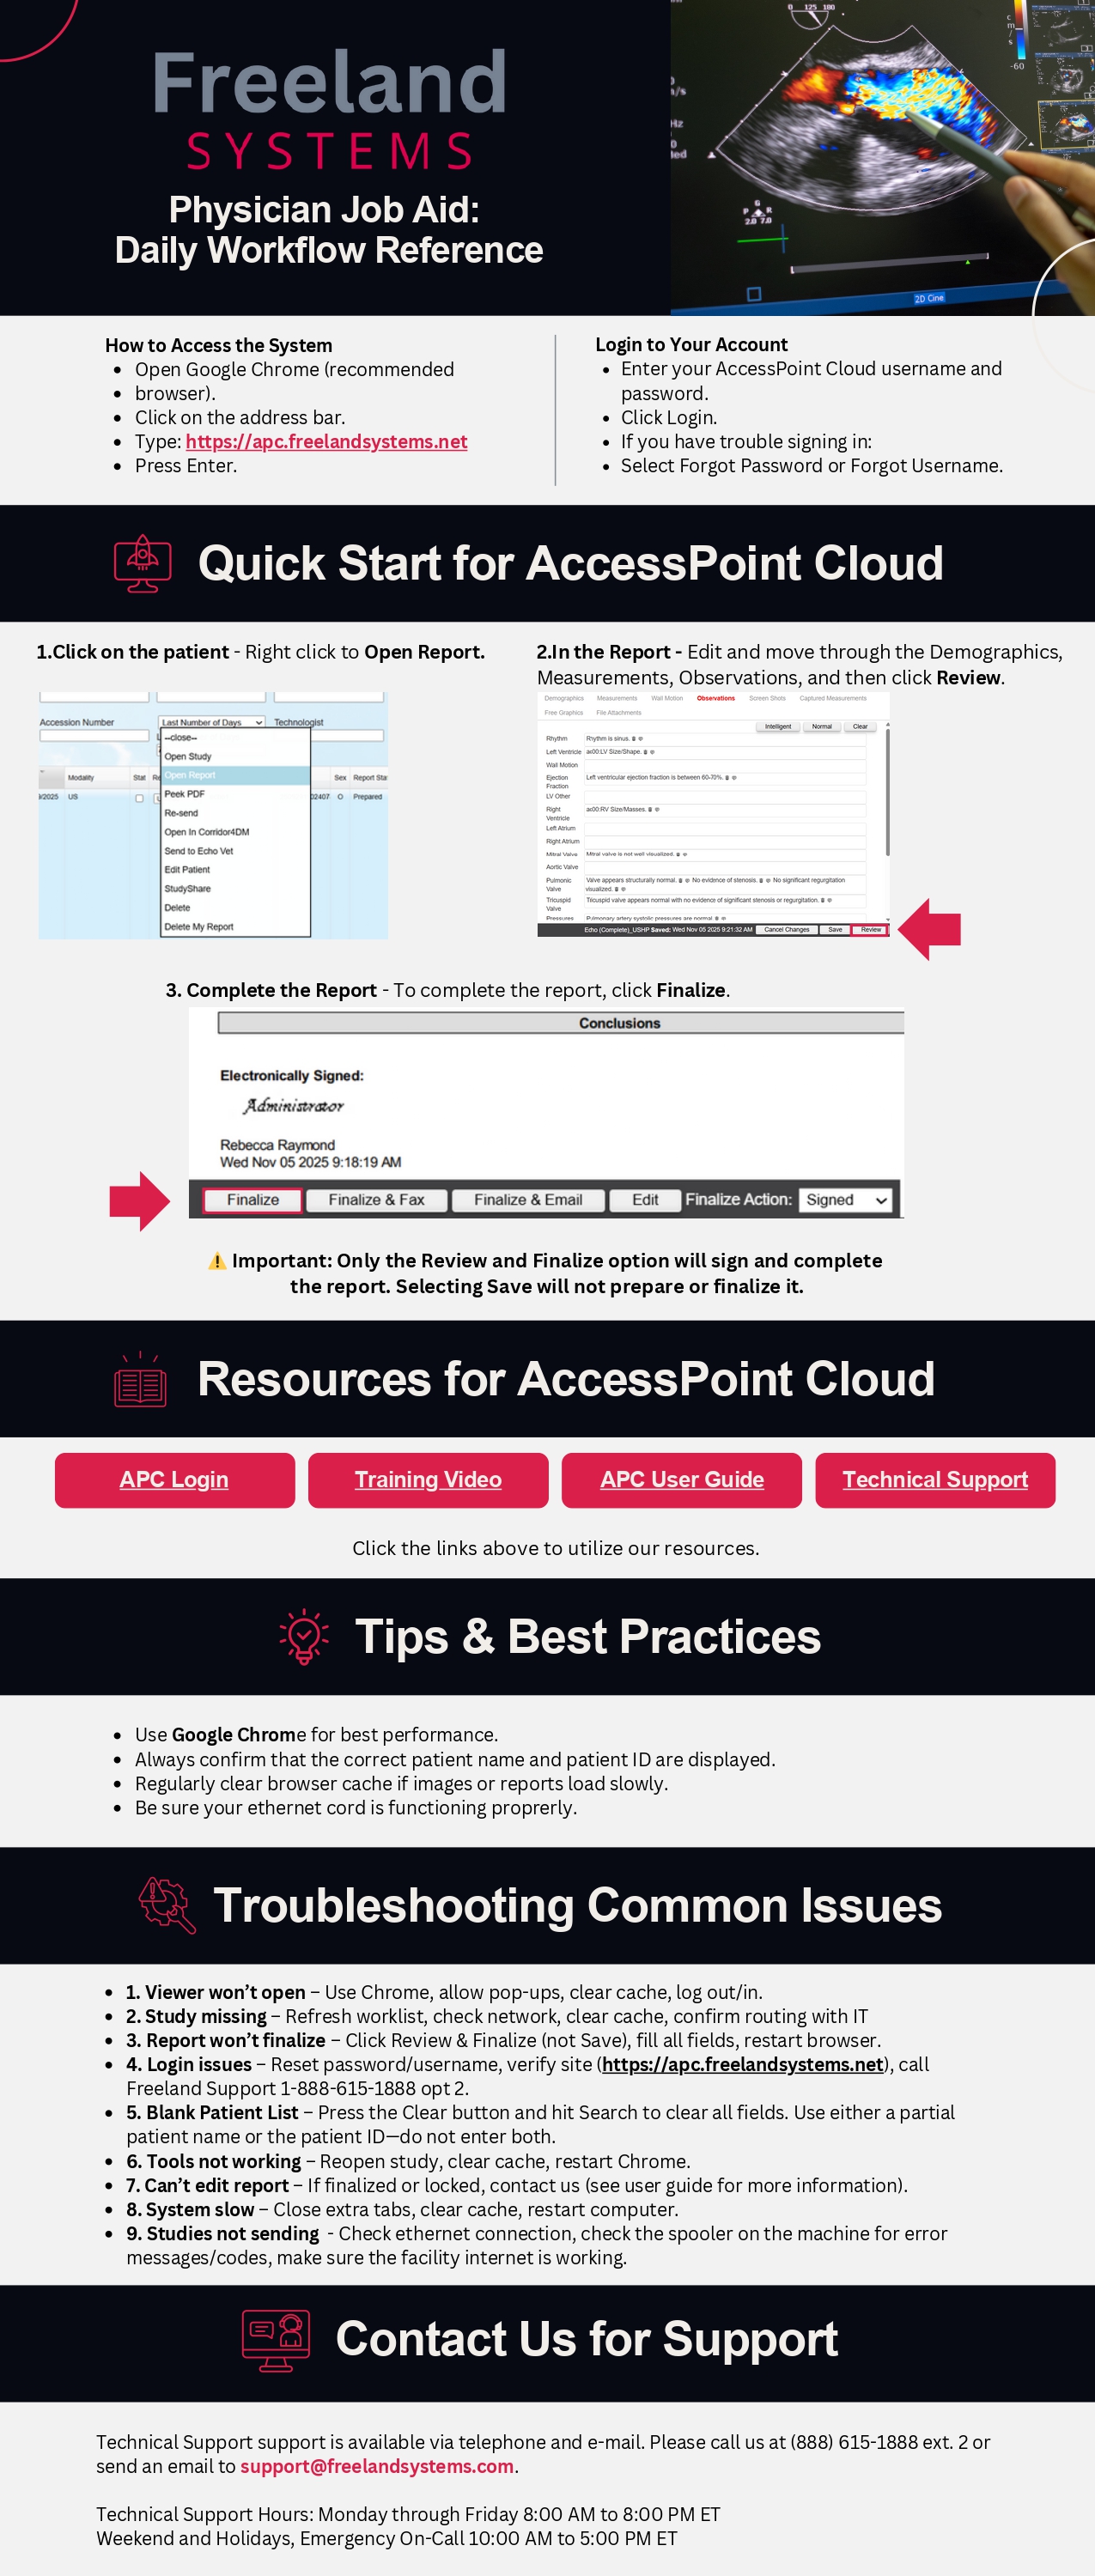
Click on the patient.
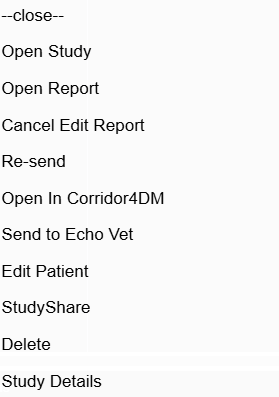
Right click to Open Study
The viewer will open.
Select Report and click Create.
In the Report
Edit and move through the Demographics, Measurements, and Observations.
To complete the report, click Review and Finalize.
⚠️ Only the "Review and Finalize" option will sign the report. Using "Save" will not prepare or finalize it.
Patient Search Screen
Locate your studies by searching:
Name
Patient ID
Accession Number
Institution
Study Description
Last number of days or Date Range
Reading Physician Last Name
Referring Physician Last Name
Technologist
Location
Report Type Dropdown
Report Status Dropdown
Read Status Dropdown
Stat Status Dropdown
Modality
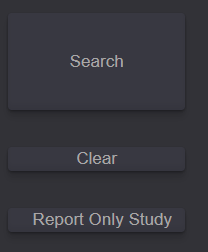
Enter the search criteria and select the Search button to display the patient list.
💡Tip: Type a partial name or ID if you are having trouble locating a study.
Date Range or Last Number of Days
Search for studies using either a date range or the last number of days.
Search by Date Range
Enter a Start and End date to display studies performed within that specific time frame.
Search by Last Number of Days
Select the Use Last Number of Days dropdown to quickly find recent studies.
Only studies completed within the selected number of days (e.g., the past 5 days) will display.
💡Tip: For faster results, a range of 5–7 days is recommended.
Read Status and Stat Status
Filter the patient report list using the Read Status and Stat Status dropdowns to focus on the most relevant studies.
Read Status Options
Read – Displays reports that have already been read.
Unread – Displays reports that have not yet been read.
💡Tip: Most physicians prefer viewing Unread reports so only studies requiring review appear. Once a study is read, it is automatically removed from the Unread list.
Stat Status Options
Stat – Displays reports marked as Stat.
Not Stat – Displays reports not marked as Stat.
By default, both Read Status and Stat Status are set to All.
Status Column
On the left side of the screen, the Status column shows the availability of each study using color-coded indicators:
Green – Available
: The study is ready to open and view.
Yellow – In Progress
: The study is still transferring and not yet ready for viewing.
Red – Pending
: The study is not ready to open at this time.
If a study is marked Yellow or Red, try the following actions:
Re-send – Re-uploads the study if the original transfer was interrupted.
Retrieve – Reprocesses or reloads the images to make the study available.
📌 AccessPoint Cloud automatically offers the appropriate Re-send or Retrieve option based on the study status.
Bottom Toolbar
The bottom toolbar helps manage how studies are displayed:
Select Page Size – Choose how many studies appear per page.
Navigate Pages – Move forward or backward through the study list.
Refresh List – Reload the current patient list.
View Study Count – See the total number of studies in the selected range.
Patient List Customization
The patient directory can be tailored to fit your workflow:
Sort columns
Hover over a column name and click to sort alphabetically or chronologically.
Rearrange columns
Click and hold a column header, then drag it to your preferred location.
Choose which columns to display
Click on the ellipsis (...) and then on the checkbox to make a column visible or remove it from your column header. You can also adjust the order of your columns in this section.
My Account Settings
Personalize your settings in the My Account tab. Here you can:
Change your password.
Update your email address.
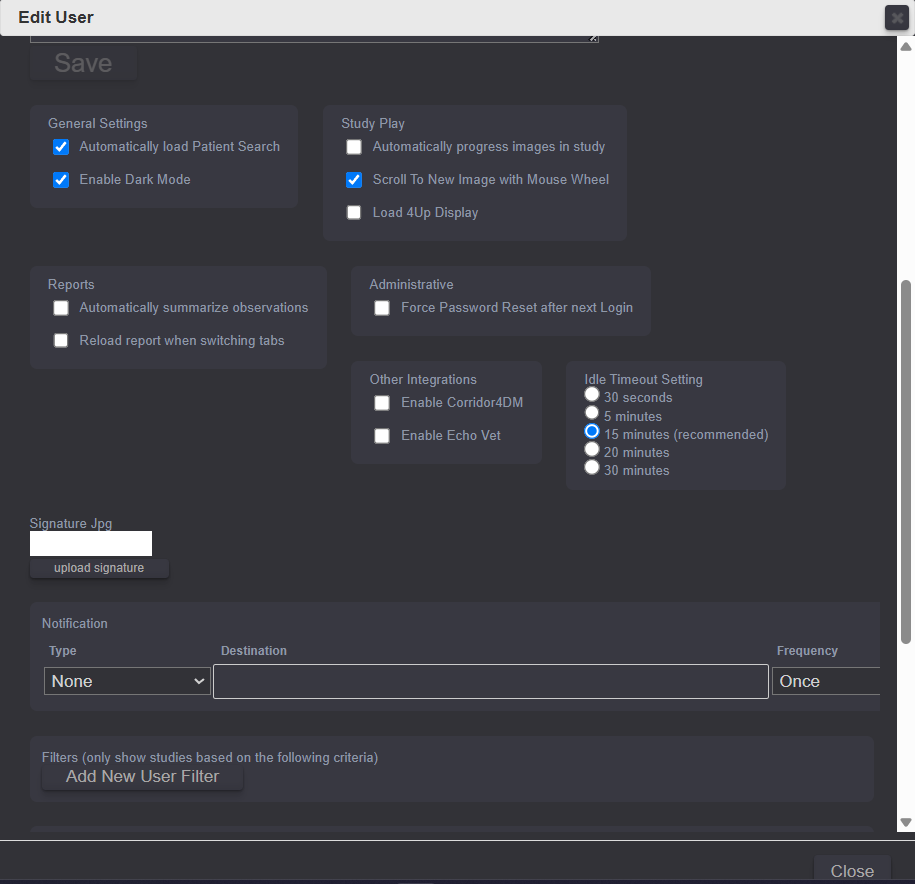
Automatically load Patient Search.
Automatically progress images in study.
Scroll to New Image with mouse wheel.
Automatically summarize observations.
Reload report when switching tabs.
Set Idle Timeout.
Enable Dark Mode.
Make any necessary changes and then click Save on the middle-left side of the screen.
Troubleshooting & FAQs
Find solutions to common issues and frequently asked questions.
Common Issues
Click a question to expand the answer.
Report button not visible
Ensure you are logged in with the appropriate user role: Technologist, Reading Physician, or Client Admin. Users without a qualifying role will not see the Report button in the toolbar.
Unable to edit a report
Reports that are finalized or signed are locked by default. Only Reading Physicians or Client Admins can unlock their own reports for edits. Once unlocked, the report must be re-signed to finalize again.
"Use Prior Observations" option is unavailable
This option is disabled when no previous report exists for the selected patient. A prior report must be finalized and linked to the same patient record for this option to appear.
Changes not saving
Confirm all required fields are completed and click Save before navigating away. If the issue persists, check your network connection or try refreshing the page and re-entering your changes.
Studies not appearing in the Patient List
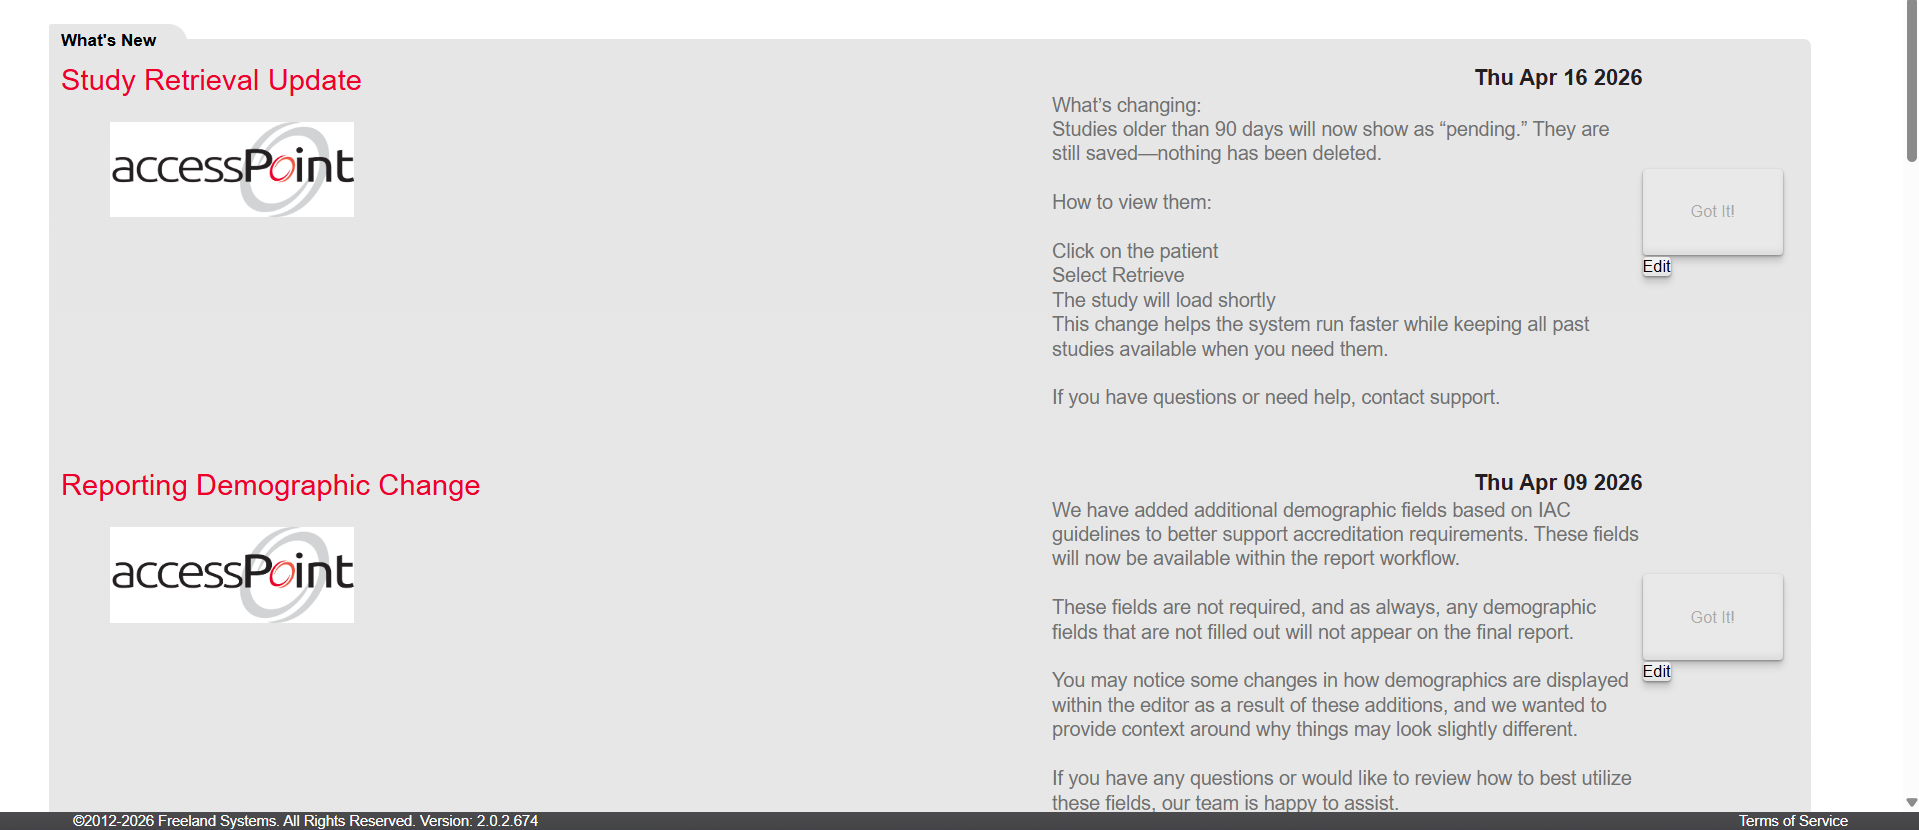
Studies older than 90 days may be set to Pending. Click Retrieve on the study to pull it from archive. Also verify your date range filter is not excluding the study.
Forgot username or password
Select Forgot Password or Forgot Username on the login screen. If you still cannot log in, contact Freeland Systems at 1-888-615-1888 opt 2 or support@freelandsystems.com.
Images are not loading or are slow
Check your internet connection speed (50 Mbps+ upload is recommended). Try clearing your browser cache in Chrome: press Ctrl + Shift + Delete and clear cached images and files. Ensure you are using Google Chrome for the best experience.
Download link not working from email
Some security settings may block downloads directly from email. Right-click the Download link and copy the URL, then paste it into a new Chrome window and press Enter.
Image Viewing Tools
Learn how to navigate and manipulate patient images.
Navigating the Clips
Click the Left Arrow on the left side of the of the toolbar to move the video frame back and the Right Arrow to move it forward.
Use the Pause button to pause the video. Click again to resume play.
Adjust the speed of the clips:
Click Plus to speed up.
Click Vertical to resume original speed.
Click Minus to slow down.
Navigating the Images
Click through images using Left/Right Arrows that are more towards the right side of the toolbar (notice how the video frame options are grayed out when on an image).
Use Left/Right Arrows on the large image (left side).
Select any thumbnail on the right to view full size.
Scroll with mouse wheel to move through images.
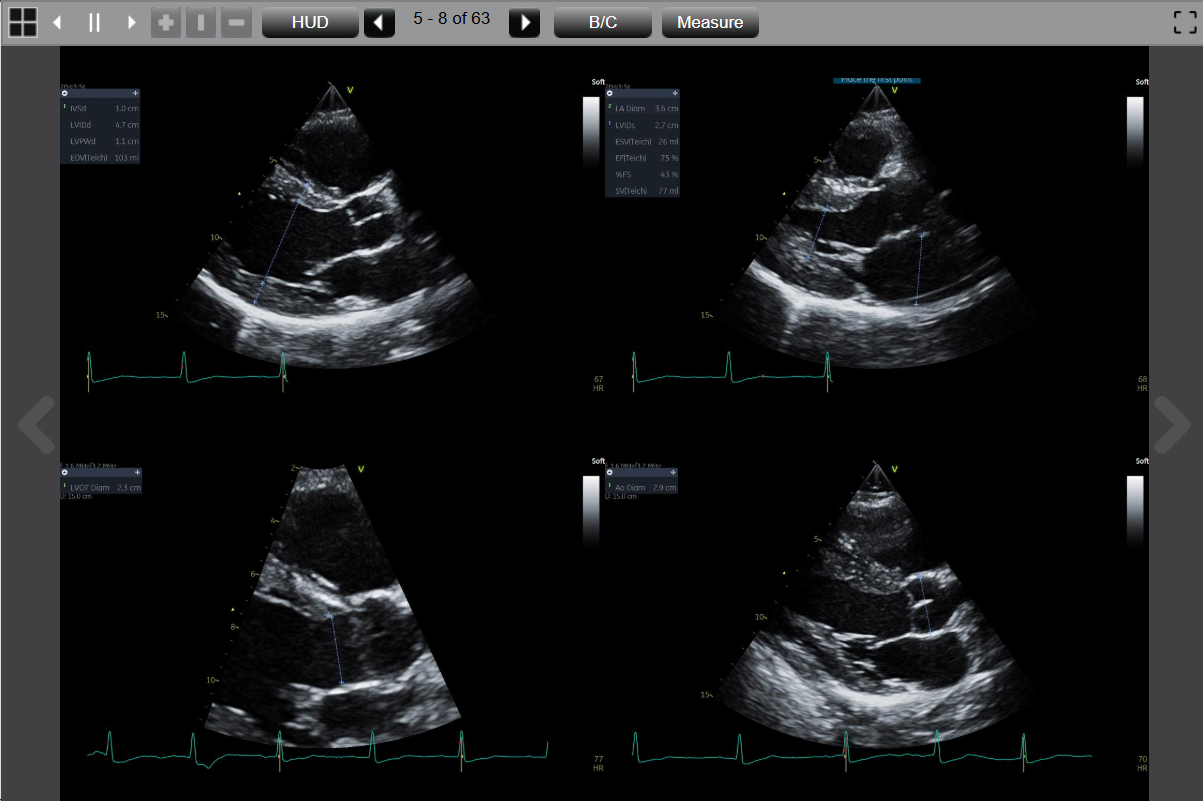
Display the 4-Up View
Click Display for 4-up view, click again for single image.
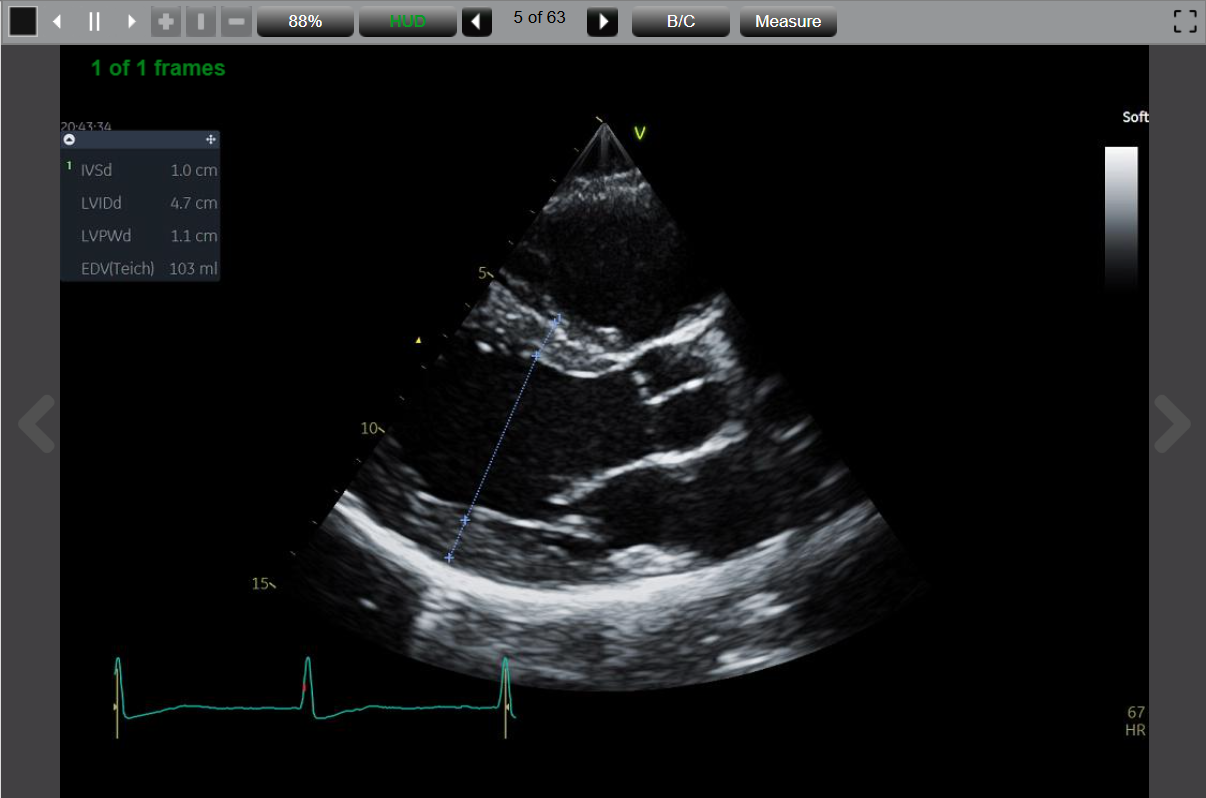
HUD (Heads Up Display)
Click HUD to display current frame info (top-left corner).
Click again to revert.
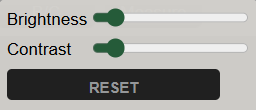
Zoom and Brightness/Contrast
Click Zoom to enlarge/reduce image; use mouse wheel to zoom.
Drag center slider to adjust zoom precisely.
Use B/C tab to adjust brightness/contrast. Click RESET to revert.
Full Screen Viewing
Click the dotted black box to enter/exit full-screen.
Thumbnails are hidden in full-screen but toolbar/Page Up-Down keys still work.
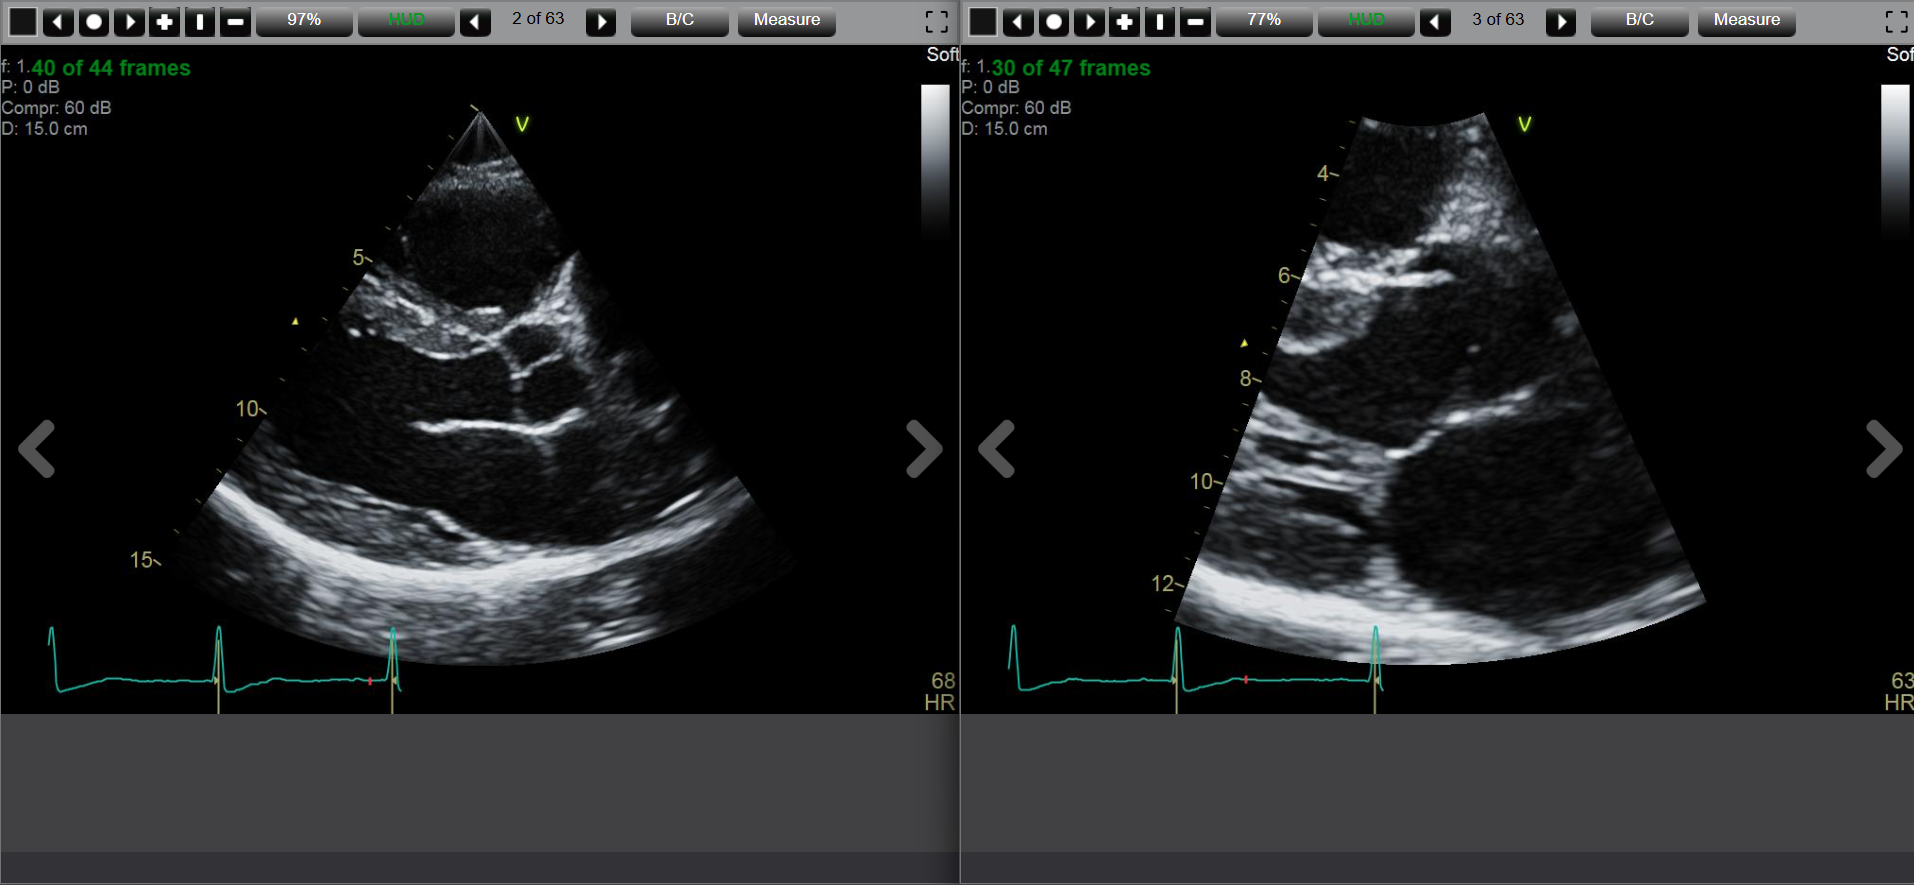
Side by Side Viewing
Open first study, then plus (+) icon next to last Chrome tab.
Open prior study, drag APC tab away, set side by side.
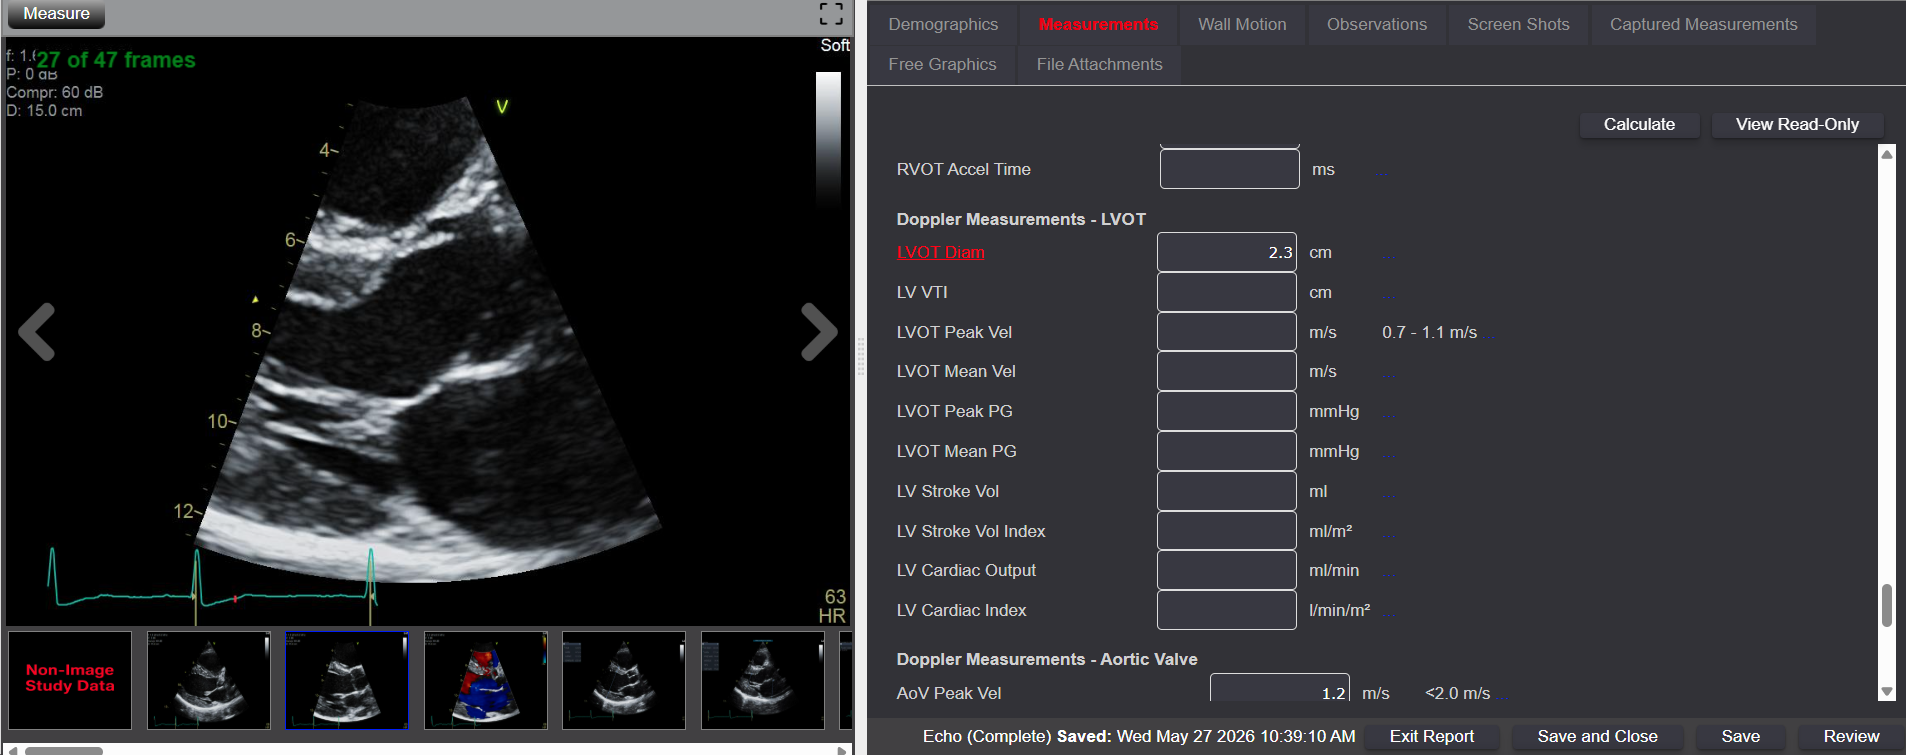
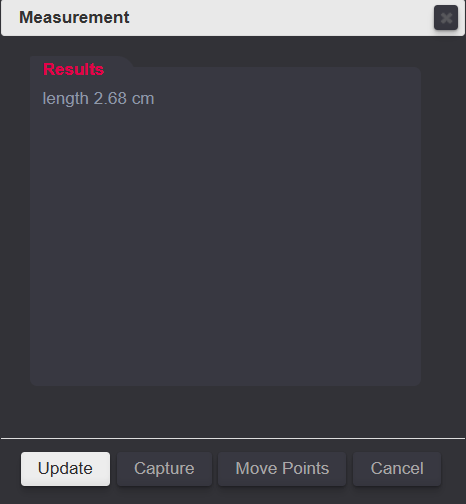
Measurements Tab
Click the Measurements tab to view data collected from the ultrasound machine during the study.
You can enter values two additional ways:
Free-text directly into the box next to the corresponding measurement name.
Or click the measurement name itself (not the text field)
to perform an offline measurement.
Take the measurement on the image by clicking the mouse to start the
measurement and click again to end.
Your measurement result window will automatically populate for
specific measurements.
Once an offline measurement is taken, the field will update with an
asterisk (*) to indicate it was done offline.
For quick reference, measurements outside the normal range will appear
in red.
💡 Tip: Use the Refresh Measurements button if the report
was opened before all measurements transferred from the ultrasound machine.
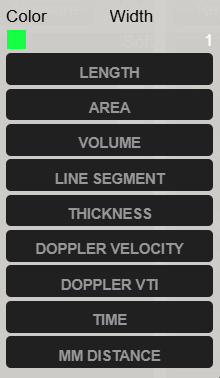
Taking Offline Measurements
Click Measurements to open menu.
Choose measurement type (e.g., 2D requires 2D image).
Click image to start, click again to end measurement.
Results window appears automatically.
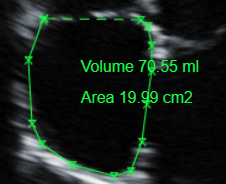
Measuring Volume Images
Click multiple points along area to measure, then click Done.
Shape completes automatically on screen.
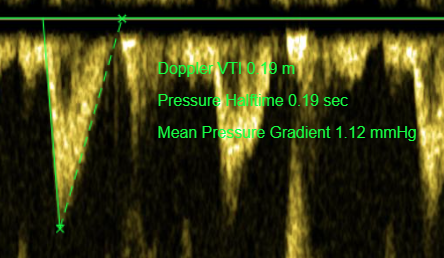
Measuring Doppler Images
Set baseline to zero for accurate Doppler measurement.
Click image to begin, line appears.
Align line with baseline, then click around envelope back to baseline.
Click Done to view results window.
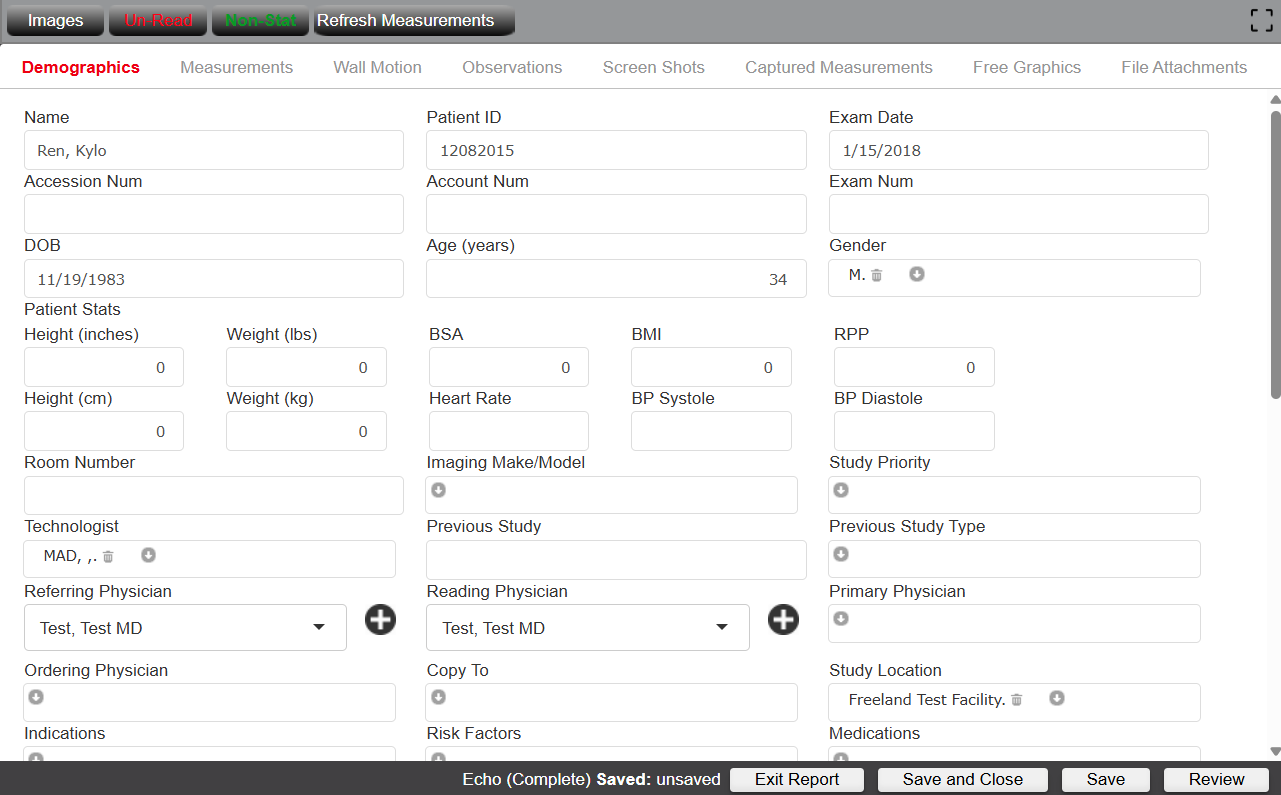
Reporting
Create and manage patient reports efficiently.
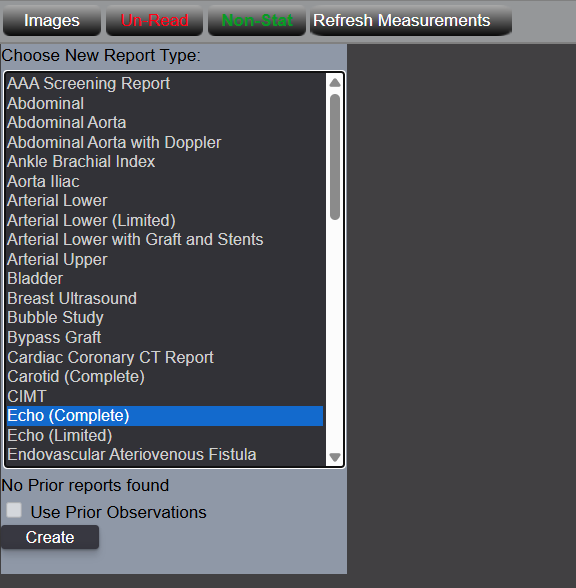
Selecting a Report
Click the Report button in the top-right corner of the screen.
Select the desired report template from the available options.
If a previous report exists, its type and date appear above the Use Prior Observations checkbox.
Use Prior Observations
Select this option to pre-populate observation statements from a previous report.
Check Use Prior Observations, then click Create to continue.
If no previous report exists, this option will be unavailable. Click Create to start a new report.
Navigating the Report
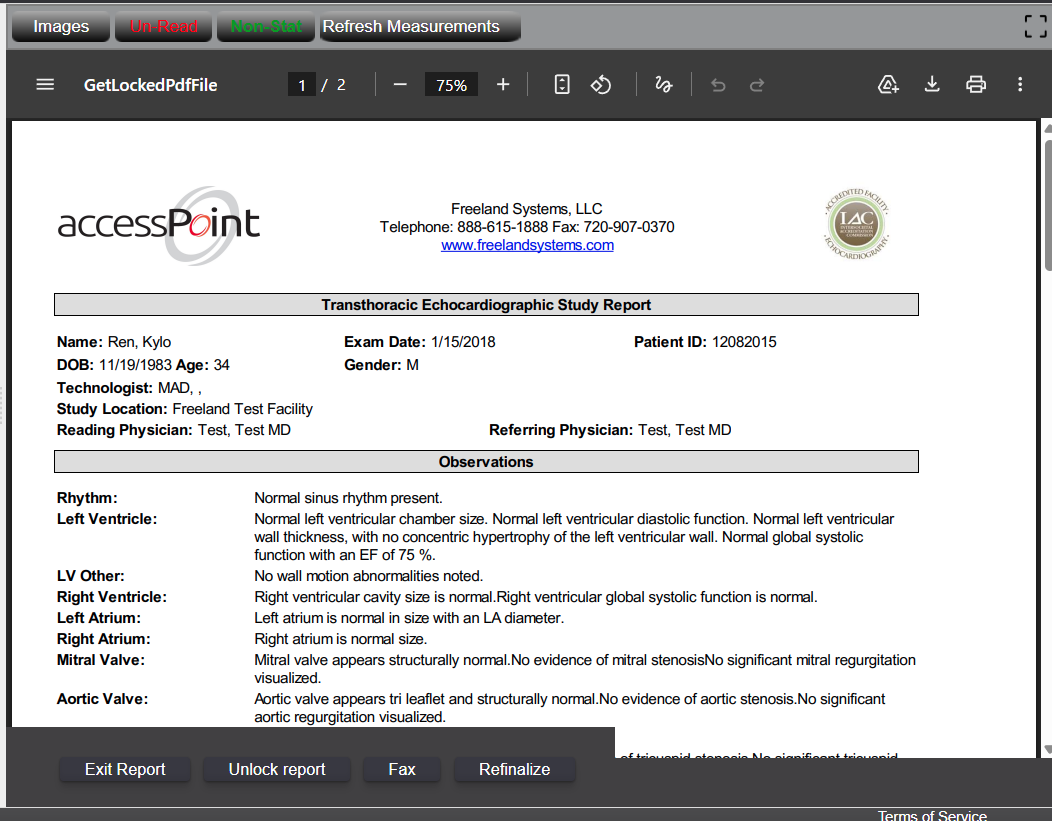
At the top, click Images to view images independently of the report.
Use the Unread / Read button to toggle the report status.
Click Non-Stat to change the report status to STAT.
Select Refresh Measurements if measurements are not populating correctly.
Completing the Report
The report template opens to the Demographics tab by default. Click any tab to complete the report sections:
Demographics
Measurements
Wall Motion
Observations
Screen Shots
Free Graphics
Captured Measurements
File Attachments
Finalize the Report
Click Review to verify report details.
Select Finalize to complete and lock the report.
Once finalized, the report can no longer be edited except by the signing physician.*
⚠️ Saving does not finalize the report. Be sure to click Review and then Finalize when the report is complete.
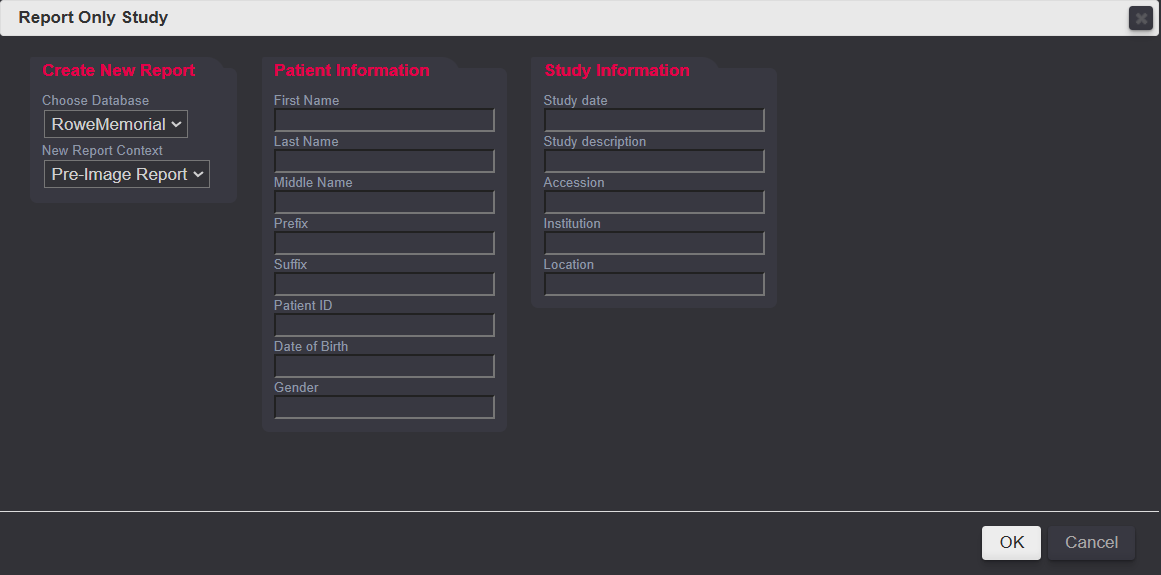
Merge Pre-Imaging Reports
Follow these steps to merge a pre-imaging report after images are transferred from the ultrasound machine.
Access the Report-Only Study
Navigate to the Patient List screen.
Select the Report-Only Study.
Create a Pre-Imaging Report
Under New Report Context, select Pre-Imaging Report.
Complete the required fields:
First Name
Last Name
Patient ID
Study Date
Click OK to create the report.
💡 Tip: Only the First Name, Last Name, Patient ID, and Study Date fields are required. Other fields may be left blank if not applicable.
Select the Report Type
Choose the appropriate report from the New Report Type dropdown (e.g., Echo, Carotid).
Click Create to begin.
Complete and Finalize
Enter all required patient and study information.
Click Review to generate the report.
Select Finalize to complete the process.
Changes to the Report
Track and update modifications to existing reports.
If you need to change the report template, please contact support.
Customize Report Phrases
Click the Report button in the top-right corner of the screen.
Select the appropriate report template.
If a previous report exists, its type and date appear above the Use Prior Observations checkbox.
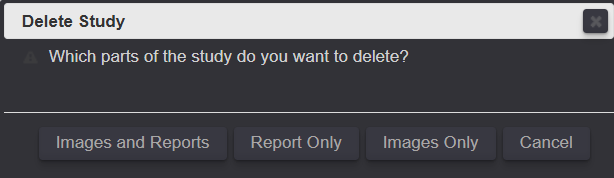
Delete Report
Click on the report you want to remove.
Click Delete My Report from the report options menu.
Confirm the deletion when prompted.
Deleted reports cannot be recovered.
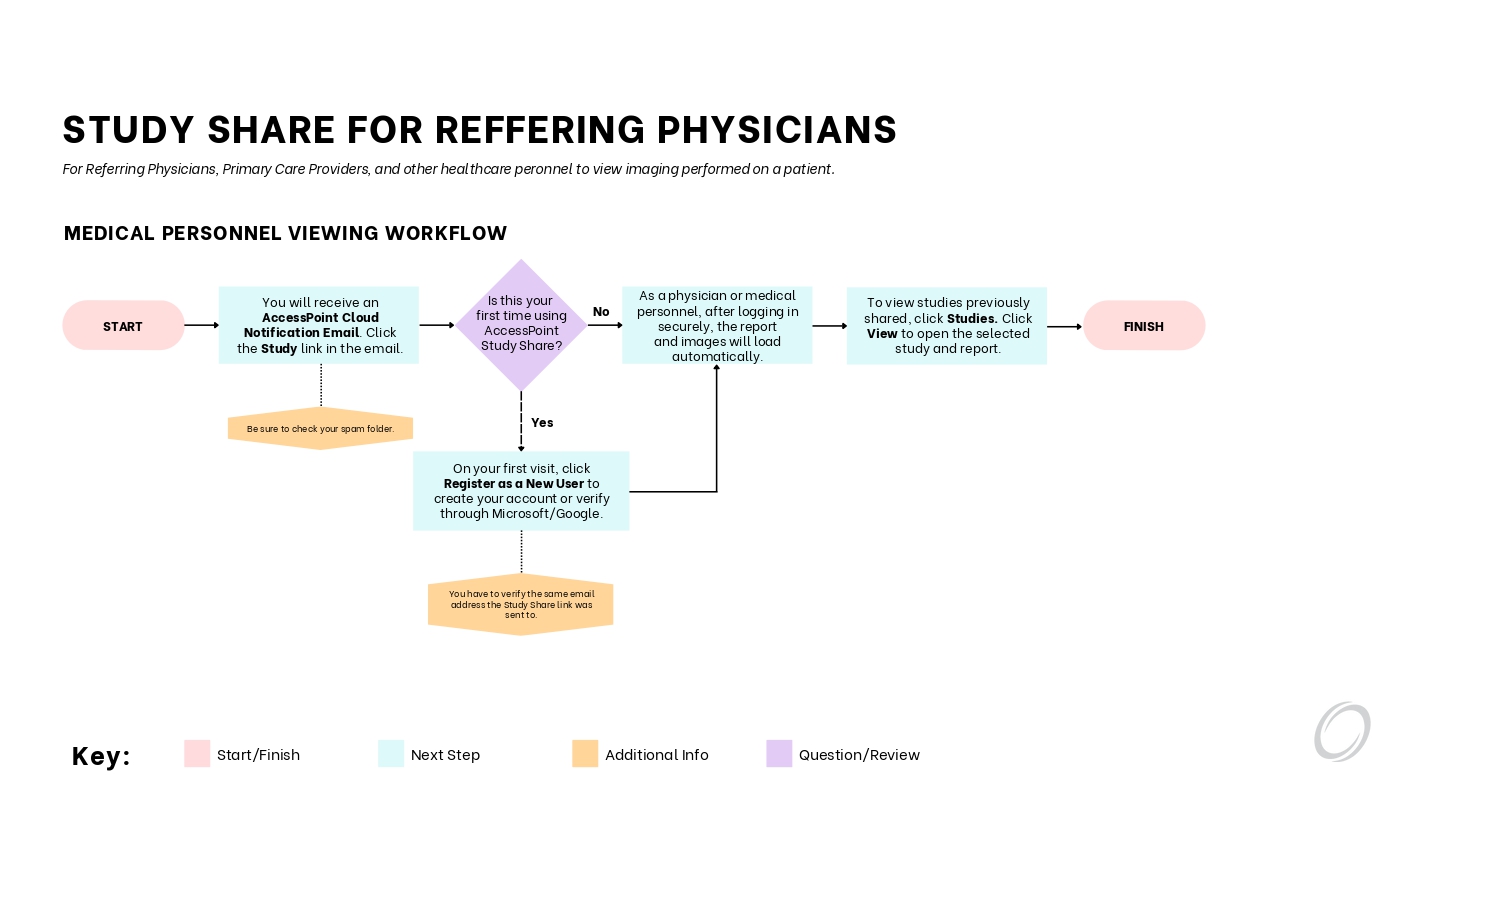
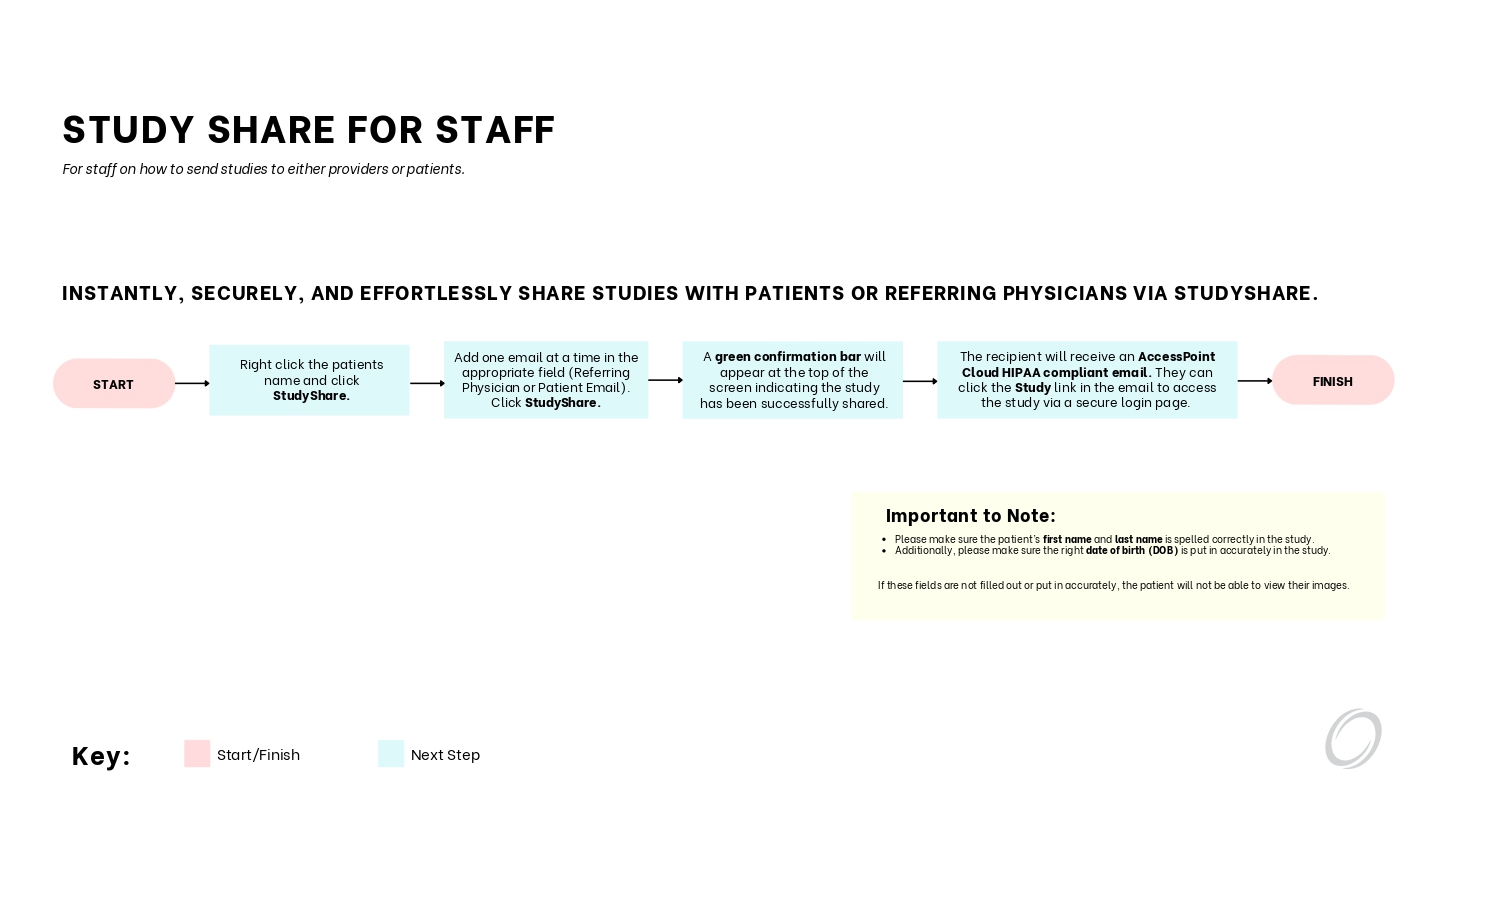
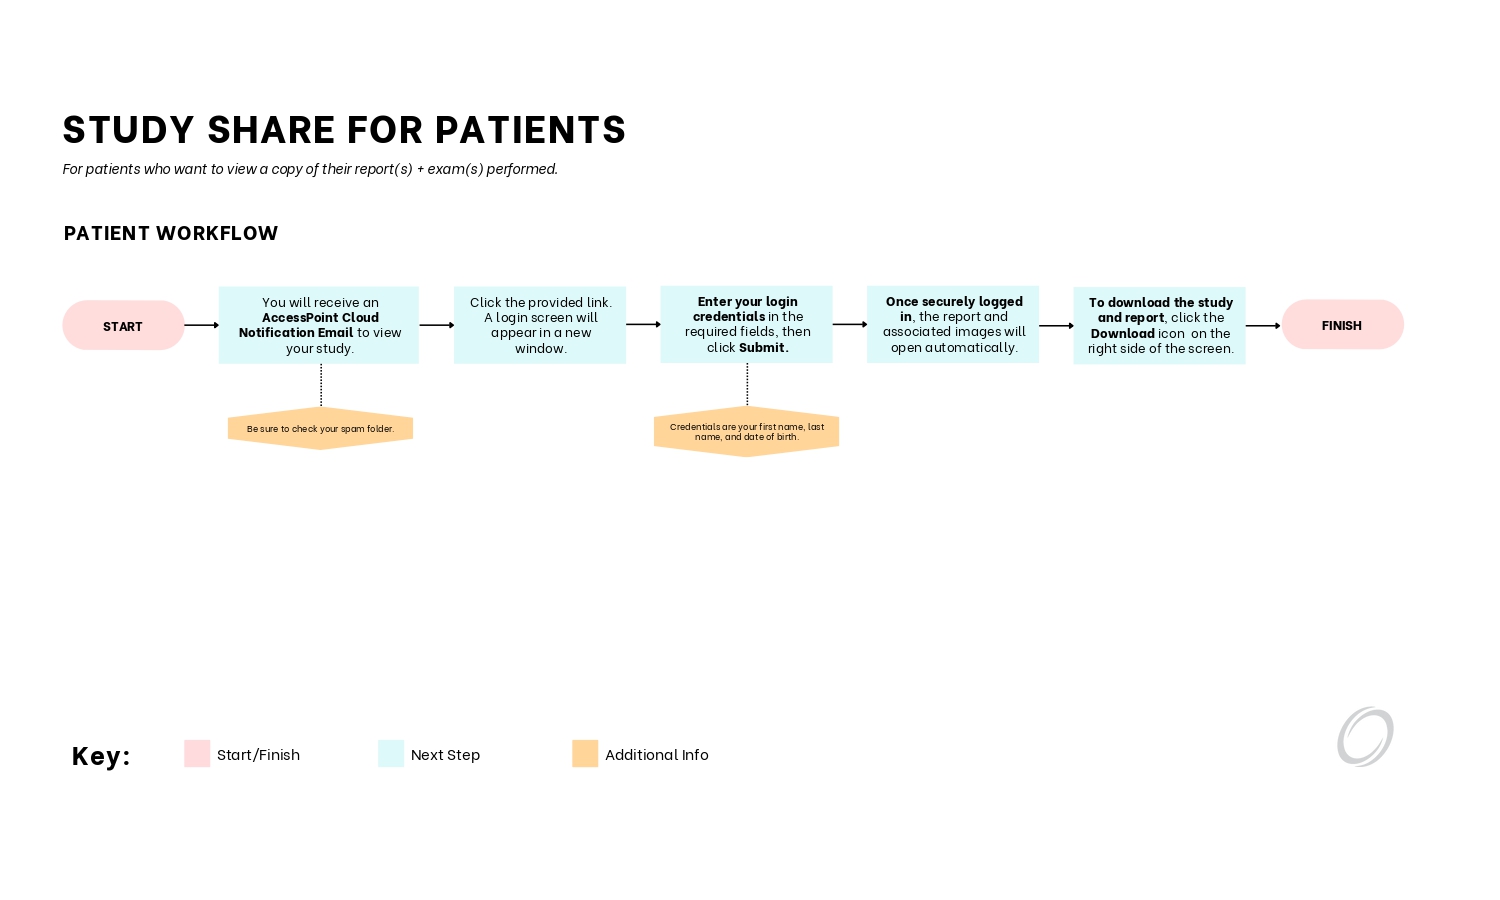
Sharing Studies
Share studies instantly and securely! Study Share allows you to send studies to patients or referring physicians via email. We also have instructions on how to burn to a CD/DVD or USB.
Study Share
Enter the recipient’s email address (Patient or Referring Physician).
Click StudyShare to send the study.
A green confirmation banner confirms the study was shared successfully.
The recipient receives an AccessPoint Cloud Notification Email.
They can click the Study link to access the study through a secure login page.
Download a Study and Report
Click Download on the black toolbar at the top of the screen.
Select the study by checking the box next to it in the Patient List.
Choose a Download Format:
ISO with Viewer – Includes images with a built-in DICOM viewer.
Zip File Only – Images and reports in a compressed file.
Click Download to begin saving the selected study.
Burning to a CD/DVD or USB
Open the email from AccessPoint Cloud Notification.
If you do not see the email, check your Spam or Junk folder.
Click the Download link and locate the file in your browser downloads or downloads folder.
Open the downloaded file to verify the study.
💡 Tip: Copy Download Hyperlink
Some security settings may block downloads directly from email.
If the download does not open:
Right-click the Download link and copy the hyperlink.
Open a new browser window, paste the link, and press Enter.
📂 Highlight all files in the download folder (Ctrl + A).
Click Share, then select Burn to disc.
Right-click the CD/DVD icon and choose Burn to disc.
Follow the on-screen prompts and click Next and Finish.
📌 Note: Burning steps may vary depending on your computer or operating system.
Additional AccessPoint Features
Explore extra tools and functionality within AccessPoint.
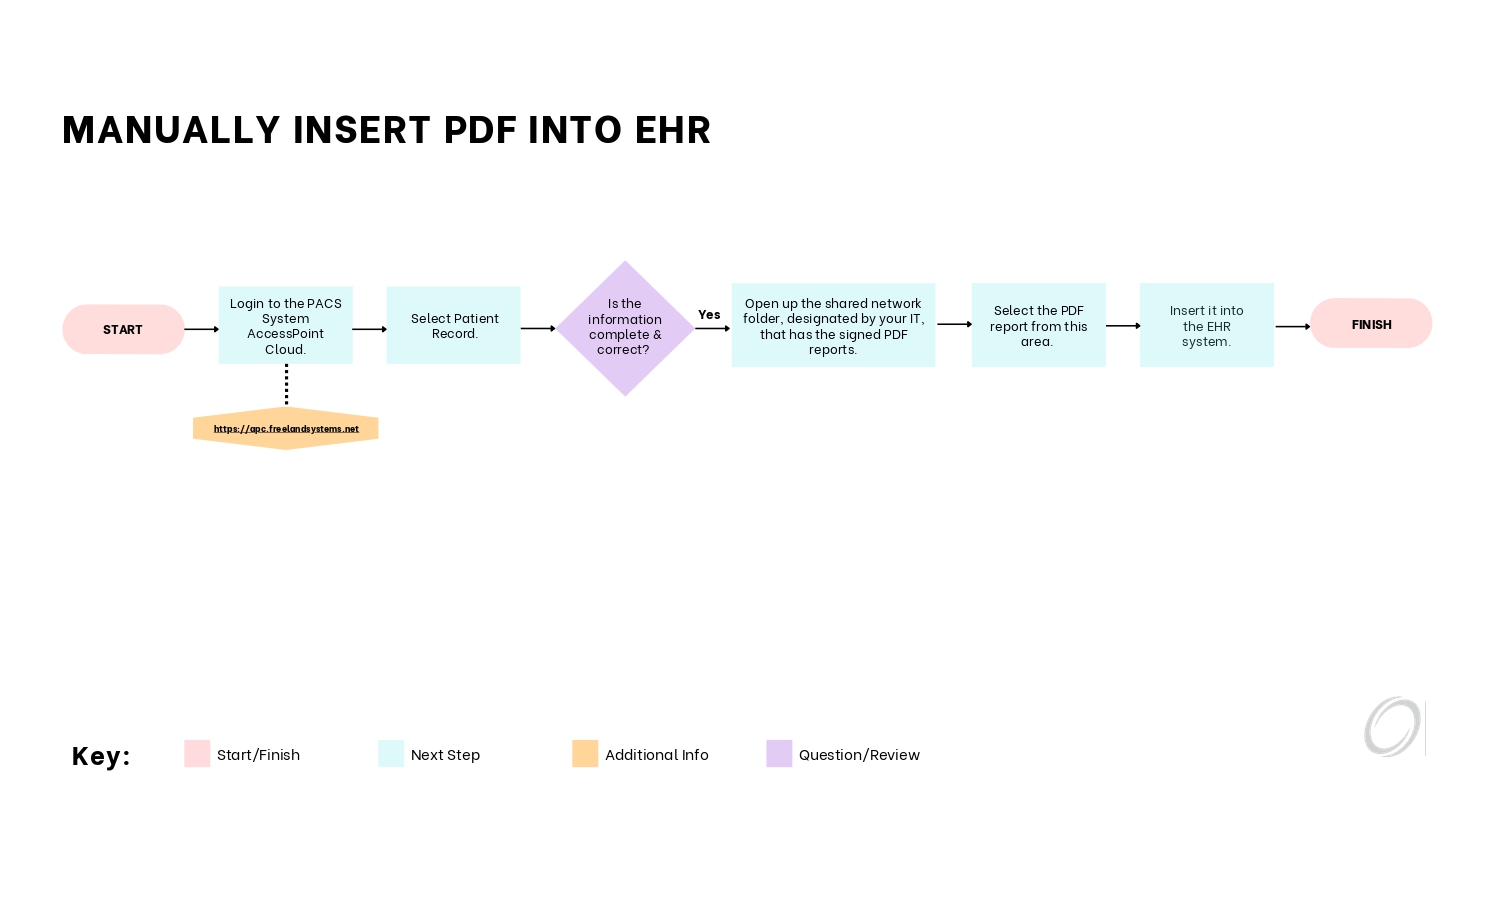
DICOM Import
Upload studies from a CD/DVD, USB, or local DICOM files using the
DICOM Import feature.
Images can also be sent directly from the ultrasound machine if configured during installation.
Click DICOM Import on the top toolbar.
📂 Drag and drop DICOM (.dcm only) files into the upload area or click to browse.
Select the files you want to upload:
Use Ctrl + A (or Cmd + A on Mac) to select all files.
Use Shift to select a range of files.
Drag the files into the dashed upload region.
Wait for the green All DICOM Files Uploaded confirmation message.
Click the Search tab to locate and view the uploaded study.
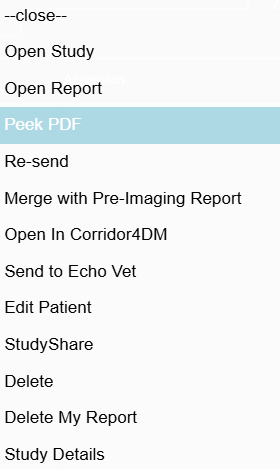
Peek PDF
Peek PDF allows you to view finalized or prepared reports
without editing the study.
While in Peek PDF mode, you can frmo the right corner:
Print the report.
Download the report and images.
Fax the report directly from AccessPoint Cloud.
To exit, click the X in the top-right corner.
Saving a PDF
Right-click the report and select Save As.
Choose a folder location on your computer.
Rename the file using the Study Name or
Patient ID.
Click Save.
Corridor 4DM
Corridor 4DM provides advanced cardiac analysis and visualization tools
for enhanced diagnostic insight. Availability may depend on system
configuration and licensing.
What's New Tab
AccessPoint Cloud updates and feature announcements appear in the
What’s New tab.
Click Got it! to acknowledge and dismiss the notification.
Client Admin
Manage account settings, users, and permissions.
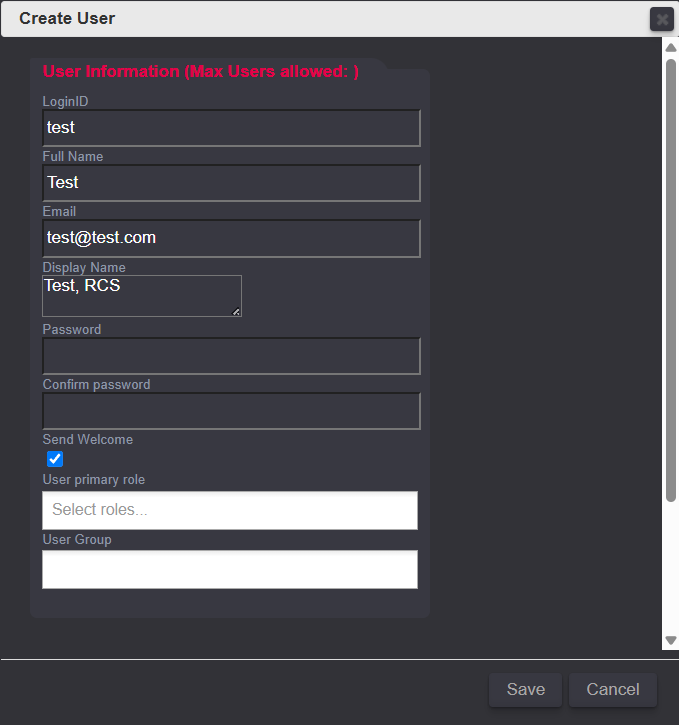
Creating New Users
Select the Users tab from the top black toolbar.
Click Create User by the top left.
The Create User dialog will appear.
Enter the required user information.
Select a User Primary Role from the dropdown.
Assign the appropriate User Group.
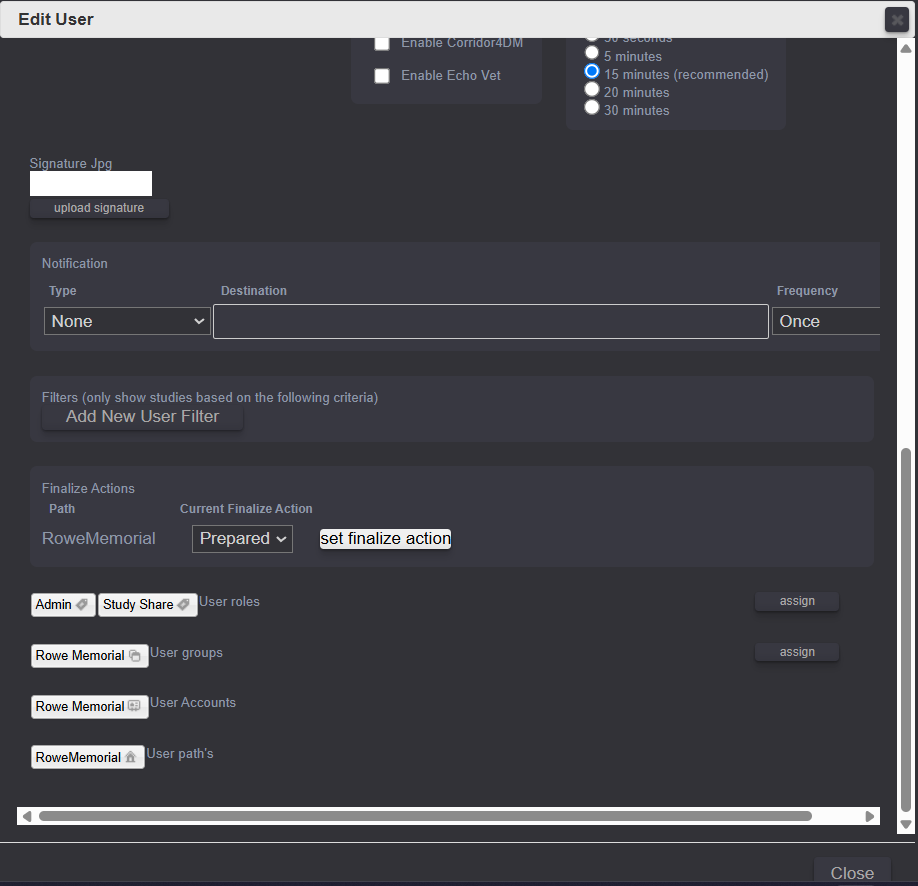
Setting Finalize Actions
Edit the user after creation to set the Finalize Action.
The finalize action determines how the user signs off on reports.
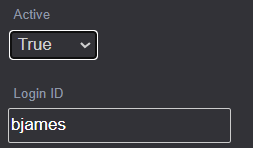
Technologists should be set to Prepared.
Physicians should be set to Signed.
Editing Users
Select the user and click Edit.
The Edit User dialog will open.
Update passwords, display names, roles, finalize actions, or active status.
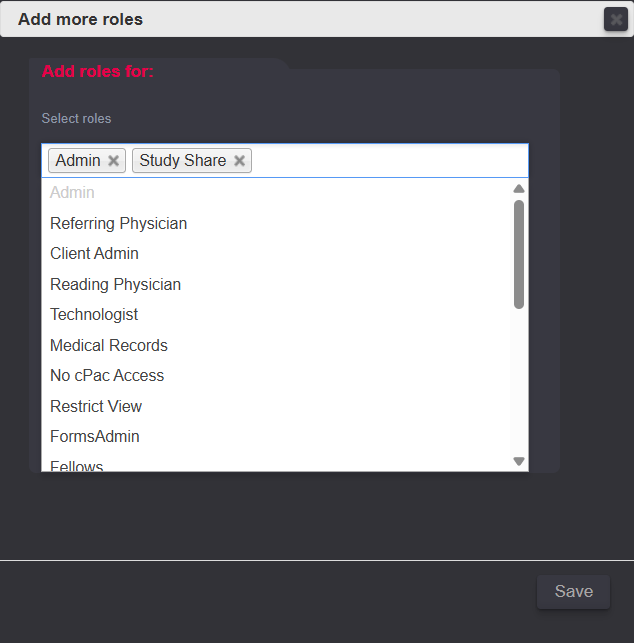
Changing User Roles
Under User Roles, click Assign to configure
permissions.
Under Active Users, users can be made inactive without
deleting their account.
User Roles
Each AccessPoint user must be assigned at least one role. Multiple roles may
be assigned per user.
Referring Physician
Client Admin
Reading Physician
Technologist
Medical Records
No cPac Access
Restrict View
Forms Admin
Fellows
Instructor
Finalize Email (Veterinary Only)
Default User / Default Vet Role
Deny Phrase Edits
Reading Physician
Access to Forms Admin for creating, editing, and finalizing reports.
Finalize Action set to Signed.
Reports are locked after finalization.
Reading Physicians and Client Admins may unlock their own reports for
corrections.
Fellows
Create, edit, and finalize reports.
Finalize Action set to Prompt.
Unlocking & Editing Signed Reports
Signed reports are locked by default after finalization.
Reading Physicians may unlock their own reports.
Client Admins can unlock any report.
Unlocking/amending the report allows edits or corrections.
Unlocked reports must be resigned to be finalized (please note that this will remove the original signed date/time stamp and replace it with the amended signed date/time stamp).
Data Management
Manage, extract, and integrate study data efficiently.
Editing Patient Data
Update Fields – Modify fields under
Patient Demographics or Study
(e.g., Name, DOB, Patient ID).
Merge Multiple Records(if applicable) –
If multiple studies share the same Patient ID, select
“Merge all Patient ID records.”
Save Changes – Click Save (bottom right)
once updates are complete.
💡 Tip: Always verify the Patient ID and
Study Details before saving to avoid duplicate records.
Data Miner
The Data Miner tool allows users to extract and analyze
report data for quality assurance, research, and operational insights.
Access Data Miner from the Client Admin or Reporting tools
(availability depends on your user role).
Select the desired date range, study type,
or report parameters.
Apply filters to narrow results by modality, provider, or patient criteria.
Export results for reporting, auditing, or internal review.
💡 Tip: Use consistent report templates and finalized reports
for the most accurate data extraction.
HL7
HL7 integration allows AccessPoint Cloud to exchange patient and study
information with external systems such as EHRs and RIS platforms.
HL7 interfaces are configured during implementation or onboarding.
Patient demographics, orders, and results can be automatically received
and transmitted.
Ensure patient identifiers (Patient ID, MRN) are consistent across systems
to avoid data mismatches.
If HL7 messages are not appearing correctly, contact support for interface
troubleshooting.
Onboarding
New to AccessPoint Cloud? Check out our onboarding process.
Getting Started
These videos cover the basics of navigating and using AccessPoint Cloud.
Logging in and navigating the interface
Viewing and searching for patient studies
Opening images and reports
Creating and reviewing a report
🎥 Coming Soon: Embedded walkthrough videos for new users.
Advanced Workflows
These tutorials focus on advanced features and administrative workflows.
Finalizing and signing reports
Sharing studies with referring providers
Managing users and permissions
Data Miner and HL7 integrations
🎥 Tip: Advanced videos may require Client Admin or Reading
Physician access.
Video Tutorials
Watch step-by-step video guides to help you navigate and use AccessPoint Cloud.
Getting Started
Description:
This training video provides a comprehensive walkthrough of the
AccessPoint Cloud platform, designed to help users navigate,
configure, and optimize their cloud environment efficiently.
Learn step-by-step how to manage accounts, deploy resources,
monitor system performance, and leverage advanced features
to maximize productivity.
Key Takeaways
Understand the core features and navigation of AccessPoint Cloud.
Learn how to configure accounts and manage user permissions.
Gain skills in deploying and monitoring cloud resources.
Discover tips for optimizing performance and troubleshooting issues.
Build confidence to use AccessPoint Cloud for everyday tasks and advanced operations.
Advanced Workflows
These tutorials focus on advanced features and administrative workflows.
Finalizing and signing reports
Sharing studies with referring providers
Managing users and permissions
Data Miner and HL7 integrations
🎥 Tip: Advanced videos may require Client Admin or Reading
Physician access.
Resources
New to AccessPoint Cloud? Check out our resources.
Helping you set up your team for success with AccessPoint Cloud.
PACS Basics for IT Professionals
This section provides foundational knowledge for on-site IT staff supporting the PACS environment. It explains core concepts, terminology, and safe support practices.
What is PACS?
PACS = Picture Archiving and Communication System
Used to store, retrieve, and distribute medical imaging studies
Replaces film-based imaging workflows
Supports radiology, cardiology, and other imaging departments
Integrates with EMR/EHR and reporting systems
What is DICOM?
DICOM = Digital Imaging and Communications in Medicine
It is the global standard for medical imaging data
Defines how images are formatted and transmitted
Includes patient data, study details, and image pixels
Uses network communication similar to TCP/IP but with medical-specific commands
Devices communicate using AE Titles, IP addresses, and ports
If DICOM communication fails, studies will not reach PACS
Change AE Titles unless instructed by Freeland Systems
Rename PACS servers
Delete study folders manually
Modify modality DICOM settings without PACS support
Enable antivirus scanning on PACS storage paths
Onboarding
These tutorials focus on advanced features and administrative workflows.
Finalizing and signing reports
Sharing studies with referring providers
Managing users and permissions
Data Miner and HL7 integrations
🎥 Tip: Advanced videos may require Client Admin or Reading
Physician access.
Specs
These tutorials focus on advanced features and administrative workflows.
Finalizing and signing reports
Sharing studies with referring providers
Managing users and permissions
Data Miner and HL7 integrations
🎥 Tip: Advanced videos may require Client Admin or Reading
Physician access.
Troubleshooting
These tutorials focus on advanced features and administrative workflows.
Finalizing and signing reports
Sharing studies with referring providers
Managing users and permissions
Data Miner and HL7 integrations
🎥 Tip: Advanced videos may require Client Admin or Reading
Physician access.
Log Me In
These tutorials focus on advanced features and administrative workflows.
In order to provide assistance, please make sure you are logged in under administrator.
Finalizing and signing reports
Sharing studies with referring providers
Managing users and permissions
Data Miner and HL7 integrations
🎥 Tip: Advanced videos may require Client Admin or Reading
Physician access.
Clinical Applications
These tutorials focus on advanced features and administrative workflows.
Finalizing and signing reports
Sharing studies with referring providers
Managing users and permissions
Data Miner and HL7 integrations
🎥 Tip: Advanced videos may require Client Admin or Reading
Physician access.
HL7
These tutorials focus on advanced features and administrative workflows.
Finalizing and signing reports
Sharing studies with referring providers
Managing users and permissions
Data Miner and HL7 integrations
🎥 Tip: Advanced videos may require Client Admin or Reading
Physician access.
Contact Support
Reach out for assistance with technical or account issues.
Send a Support Ticket
Please contact our Technical Support team for quick answers to your questions or resolution of your Freeland Systems related issue. Our Technical Support professionals are highly trained and possess expert product and application knowledge.
Our escalation program coordinates activities between Technical Support, Implementation, Training, and IT departments as well as our development staff to ensure consistent, efficient customer and product support responses.
Text Us
Click on your profile icon in the top-right corner.
Update password, contact details, or notification preferences.
You can also switch from light mode to dark mode here.
Adjust Viewer defaults like layout, annotations, or measurement units.
Chat With Us Online
Click on your profile icon in the top-right corner.
Update password, contact details, or notification preferences.
You can also switch from light mode to dark mode here.
Adjust Viewer defaults like layout, annotations, or measurement units.
Log Me In
There are times when we will ask you for a connection to your computer. If possible, please connect us to the computer where the software was set up so we have access to the server. Our team utilizes LogMeIn Rescue to assist. Please follow the directions below:
In order to provide assistance, please make sure you are logged into the computer under administrator.